
A
Printing
This appendix includes information about printing text and files. The network computers are equipped with various printing capabilities. There is the spooler which runs locally on the network computer, the Print Screen key, and the data_xp utility which opens a socket connection from the host to the network computer. Each enables you to print files and text-only screens to local and remote printers.
Printing Using the Spooler
A simplified version of a BSD spooler runs locally in the network computer, adding the ability to print text within local Tek3270, Tek220, Tek340, and Teemx emulators. The print request can be set to a printer connected to a local network computer, to a remote printer on the network, or to another network computer. The spooler allows background processing of the print request and also accepts requests from other machines. The spooler settings cannot be saved in NVRAM. This section describes the steps for printing on a local printer and on a remote printer.
Using a Local Printer
- Set up a local print queue for the spooler using the following commands in the remote configuration file (xp.cnf). When printing, a printer queue on the host forwards the print request to a local queue on the network computer.
- enable_print_spooler
- spooler_size
- spooler_local_queue
- Refer to Chapter 2, Remote Configuration for information about these commands.
- If using Serial Ports, configure them to match the settings on the printer. Use either the Serial Ports Configuration commands in the xp.cnf file, or the Peripheral Ports menu in Setup. Refer to Chapter 2, Remote Configuration or Chapter 3, Setup for details about each method.
- Reboot the network computer to read and update the new print queue and serial port settings.
- On the host, create a new queue pointing to the network computer's local print queue. If your host has a specialized system administration tool (such as Hewlett-Packard's SAM or IBM's SMIT), use it to add the queue. Refer to your host documentation for information about creating print queues.
Example
The following example shows the steps for setting up a local print queue on a network computer and UNIX host that does not have a specialized system administration tool.
enable_print_spooler YES
spooler_size 8096
spooler_local_queue lp PP0
- If using a serial port, configure the port to match the settings on the printer. Use the Serial Ports Configuration commands in the xp.cnf file.
- Reboot the network computer to read and update the xp.cnf file.
- On the host, edit the /etc/printcap file to create a new queue pointing to the network computer's local print queue. If your host has a specialized system administration tool (such as Hewlett-Packard's SAM, IBM's SMIT, or the Sun Solaris), use it to add the queue.
Note: The /etc/printcap applies only to the Sun OS or the Solaris 2.4 or below. For Solaris 2.5 or above, use these command lines: /usr/lib/lpadmin -p local4 -s ncdu876
/usr/lib/lpadmin -p local4 -o lf=/usr/adm/lpd-errs
/usr/lib/lpadmin -p local4 -o sd=/usr/spool/local4
/usr/lib/lpadmin -p local4 -o rm=ncdu976
/usr/lib/lpadmin -p local4 -o rp=local4
The printer database file for Solaris 2.5 or above is /etc/printers.conf.
- Solaris Example:
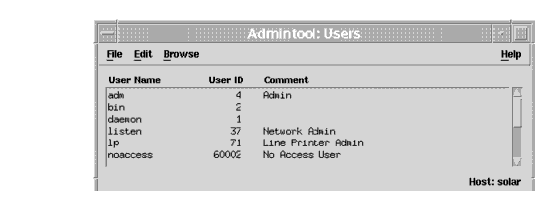
- Run admintool on Solaris, as shown in Figure A-1.

- On the Browse menu, select Printers.
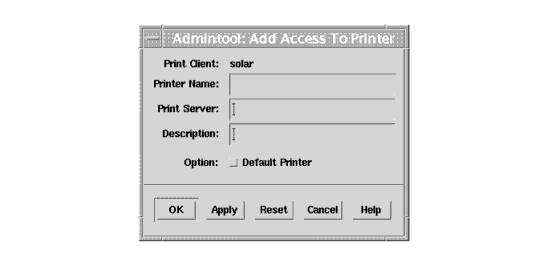
- On the Edit menu, select Add Access to Printer and the Add Access to Printer dialog appears, as shown in Figure A-2.

Figure A-2 The Add Access to Printer Dialog
- In the Printer Name box, enter lp.
- In the Print Server box, enter the fully qualified domain name for the NC. For example: sierra.ncd.com.
- Select Apply.
- If, instead of using a system administration tool to edit the /etc/printcap file, you are using the lp queue specified in the spooler_local_queue command above, the entry in /etc/printcap would look like this:
user1_queue:\
:lp=:\
:rm=sierra:\
:rp=lp:\
:sd=/usr/spool/lpd/user1_queue:\
:mx=8096:\
:lf=/usr/spool/lpd/ERRORLOG:
- In this example, the queue name is user1_queue, the remote printer queue is lp, the network computer name is sierra, the location of the spooler queue is /usr/spool/lpd/user1_queue, the spooler size is 8096 bytes, and the error file name is ERRORLOG. Refer to the printcap man page for details about each line and other settings that can be used.
- Make a new subdirectory for the new queue. In this example, the new subdirectory is user1_queue in /usr/spool/lpd:
Using a Remote Printer
- On the remote host (the host to which the printer is connected), add the network computer's name to the /etc/hosts.equiv file. This sets up the network computer as a "trusted user" with the remote host and allows access without issuing a password.
- Set up a remote print queue pointing to the remote machine using the following commands in the remote configuration file (xp.cnf). When printing, a printer queue on the local host forwards the print request to the remote machine.
- enable_print_spooler
- spooler_size
- spooler_remote_queue
- Refer to Chapter 2, Remote Configuration for information about these commands.
Example
The following example shows the steps for setting up a remote print queue on a UNIX host that does not have a specialized system administration tool.
spooler_remote_queue lp sierra printer1
- Reboot the network computer to update with the new xp.cnf and serial port settings.
Once the queues are set up and verified, print requests can be sent.
Defining a Print Screen Key
A Print Screen key is used to print the contents of a local terminal emulator window, for example Tek220, Tek340 or Tek3270. To define a Print Key, use the keyboard translations settings (added to the .Xdefaults file) to assign the Print Key function to any key you like. In this example, the F2 key acts as the Print Screen key on the Tek220 emulator:
tek220.translations: #override <Key>F2: print()
For detailed information about the keyboard translations, refer to the Keyboard Translations Settings topic in your NCD NCBridge Installation and Configuration manual.
data_xp Application
data_xp is an application that runs on the host and is used to open a socket connection over the network from the host to the network computer. This socket connection is necessary when using the net-to-port feature to print files. Multiple devices can be connected to multiple serial and parallel ports. When printing, data_xp does not change the original format of the file. It prints the file exactly as it appears on the host application.
The data_xp application can also be used as an example when creating your own printing applications for reading from and writing to a port. data_xp is located in /tekxp/examples for UNIX and Windows NT hosts, and [TEK.XP.SRC] for VMS hosts.
Printing Files Using data_xp
To print a file using data_xp:
- Configure the serial or parallel port(s) to use on the network computer. You can use multiple ports simultaneously for multiple devices. Use the Net-to-Port configuration commands in the remote configuration file (xp.cnf), or enter Setup and use the Peripheral Ports options. Be sure to specify which socket is to be used.
- Reboot the network computer to update with the new settings.
- Connect the printer to the configured port on the network computer.
- The file to be printed must be saved in a format that the printer can understand, for example, ASCII format for an ASCII printer, or PostScript format for a PostScript printer. Refer to your application's documentation for information about saving in a specified format.
- Use data_xp to read the file and send it to the printer. Enter the network computer's address (or name if using domain name service) and the filename to print:
# data_xp -addr network computer address -in filename
- Optional data_xp parameters are:
- -tdenet specifies the TDEnet protocol.
- -debug prints debug information.
- -nctld specifies no Ctrl-D at the beginning and end of a file sent to the printer. By default, data_xp sends a Ctrl-D at the beginning of the file, waits for a reply, sends the file, sends a Ctrl-D, waits for a reply, and sends a final Ctrl-D. If using a PostScript printer, do not use this option.
- -dtime integer specifies a delay of seconds when sending Ctrl-D or when checking for a network connection (-nctld). The default is 5 seconds.
Printing Files Using Teemx
Note: The Teemx client provides local 3270 and 5250 terminal emulators.
- Configure the serial or parallel port(s) to use on the network computer. You can use multiple ports simultaneously for multiple devices. Use the Net-to-Port configuration commands in the remote configuration file (xp.cnf), or enter Setup and use the Peripheral Ports options. Be sure to specify which socket is to be used.
- Reboot the network computer to update with the new settings.
- Connect the printer to the configured port on the network computer.
- Start the Teemx emulation client.
- Select the "Printer Setup" option from the "File" pull-down menu. This brings up the "Text Printer Settings" dialog box. Available print queues are listed. Choose a printer by entering the name of the desired printer or by double-clicking on the entry in the queue list. To accept printer settings, click "OK". To abort, click "CANCEL".
- Here is a typical example of printer settings:
- spooler_remote_queue lp2 128.181.189.98
Serial and Parallel Ports
Figure A-3 shows the back panel of the NC900 series network computer and the placement of the serial and parallel ports (the parallel port is an option).
Figure A-3 Back Panel of the NC900 Network Computer
Serial Ports
There are two serial ports, Serial Port 0 and Serial Port 1. Figure A-4 shows the serial port diagram. The pinouts (listed in Table A-1) are the same for both ports.
Figure A-4 Serial Port Diagram
Parallel Port Pinouts
A 25-pin female Centronics-compatible parallel port is available on the NC900 Series network computers as an option. Figure A-5 shows the parallel port diagram and Table A-2 lists the parallel port pin numbers and signal names.
Figure A-5 Parallel Port Diagram