

Operating the Network Computer
Powering On the Network Computer
The first step is to power on your network computer. For network computer models with a separate logic module, power on both the display and the logic module. Figure 2-1 illustrates the location of the power switch for the NC900 series base.

If the network computer does not power on, refer to Chapter 6, Troubleshooting for troubleshooting information.
The Network Computer Boot Process
When your network computer is powered on, it automatically begins booting. Booting means your network computer is locating and reading its start-up files. The boot screen shown in Figure 2-2 appears on your display as the network computer is booting.
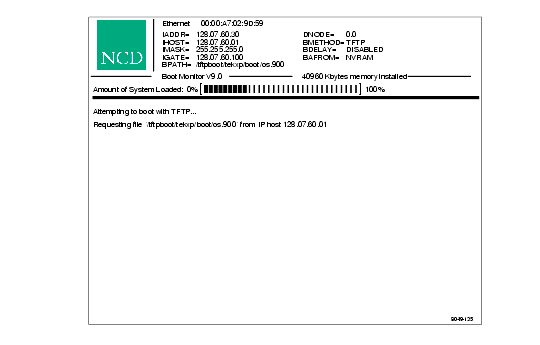
During a normal boot, the network computer successfully locates and begins to read the boot files and the Percent of File Loaded slide bar appears on the boot screen. During a boot, pressing any key on the keyboard halts the boot process. Do not halt the boot unless directed by your system administrator.
If the slide bar does not appear, or, if your network computer displays a BOOT> prompt, the boot has halted. To try the boot again, type b and press Enter.
If the boot fails again, call your system administrator or refer to Chapter 6, Troubleshooting for more information. To help troubleshoot the boot problem, write down any messages that were displayed.
Your network computer is attempting to boot from the network or from an optional Flash memory or ROM board (read only memory). You can tell how your network computer is trying to boot by looking at the Boot Method (BMETHOD=) status line on the boot screen. Possible values are ROM, TFTP, NFS, or MOP.
Logging In to the Network Computer
The next step depends on the way your system administrator sets up the network computer software on the host computer. Each login method is illustrated and described in the following sections to help you identify your login method.
After your network computer completes the boot process, one of these should appear on your monitor:
If you cannot log in, refer to Chapter 6, Troubleshooting for troubleshooting information.
The login method is determined by the Host Connect Method command. This command is set by the system administrator in the remote configuration file or through Setup on the network computer.
Logging In from the Root Weave
The root weave is a gray, patterned screen available on all network computers. When the network computer is ready for input, an X-shaped cursor appears on the screen. A network computer with the root weave and cursor is illustrated in Figure 2-3.
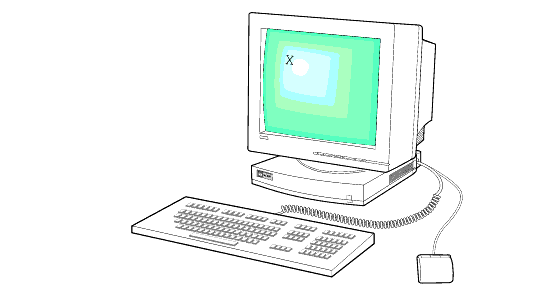
To log in from the root weave, you need to manually start the Client Launcher.
Press Setup or a key combination, depending on the keyboard type (see Table 1, Setup Key and Key Sequences,on page ix), to bring up the Client Launcher. Refer to Logging In with Client Launcher.
Logging In with Client Launcher
The Client Launcher starts the local client you select from a menu. An arrow to the right of an entry indicates a submenu. In Figure 2-4, selecting Host Connections displays a submenu listing available host connections, such as Telnet or Cterm.
Your system administrator configures the Client Launcher to include the local clients you use most often. (Refer to your NCD NCBridge Installation and Configuration manual for details on defining the Client Launcher menu.) The Client Launcher on your network computer may list different clients and submenus than those that appear in Figure 2-4.
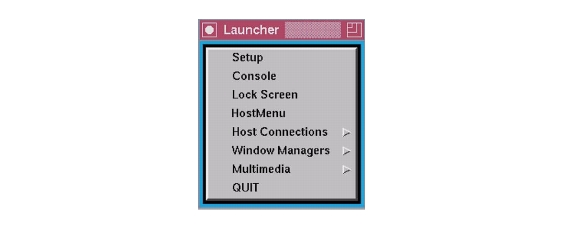
Use one of these methods to start a client from the Client Launcher:
If using Client Launcher to open a host connection, see the applicable section:
The Client Launcher appears automatically if it is specified in the remote configuration file. The applicable command is start (set to LAUNCHER).
Logging In with HostMenu
HostMenu is a window showing a list of host computer names and network addresses. Figure 2-5 shows a sample HostMenu.
Notice the list buttons across the top (for example, XDMCP and VMS TDEnet). These buttons determine which type of log in list is displayed. The button pressed in indicates which list is currently displayed.
If there are more host names than can fit on one screen, use the mouse to scroll through the host names. If your host does not appear on the list, try clicking the Update button or click one of the list choice buttons to display a different list. If it still does not appear, contact your system administrator.
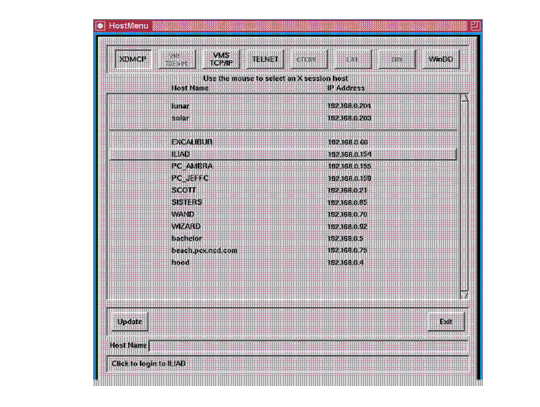
To log in with HostMenu using either the mouse or the keyboard:
- Using the mouse, position the pointer on a host computer where you have a login account. If your host is not displayed, try the Update button or look for your host on one of the other lists (change lists by clicking one of the list buttons across the top).
- Click the Select button (left mouse button) to connect to the host.
- Using the keyboard, enter the host's name or address in the Host text box and press Enter. If connecting to a LAT host, enter the Node's name or address in the Node Name text box, and the Service name in the Service Name text box. Use the keys listed in Table 2-1 to edit and move around the HostMenu.
Table 2-1 Keyboard Interface for HostMenu
The first few letters of the hostname, or if using LAT, the first few letters of the service name
After selecting a log in host, some type of screen with a Login: prompt is displayed. If you selected the wrong host, press Ctrl-c to close the login box without logging in to the specified host. Depending on your log-in method, another action may be required. For example, if Telnet was the log-in method, type exit to log out.
For more information, see the applicable section:
Continue with Chapter 3, Using the Network Computer.
HostMenu appears automatically if it is set up as the connection method through the remote configuration file or through Setup. The applicable commands are Host Connect Method (set to HostMenu) and Default Host List which determines the list that is initially displayed.
Logging In at a Login Prompt
If your system administrator has set up your network computer to directly log in to a specific host, some type of welcome screen with a login prompt is displayed. A welcome screen is also displayed for programs like HostMenu after a connection is made. Sample login screens for the UNIX host oregon and the VMS host IDAHO are illustrated in Figure 2-6 and Figure 2-7.

Continue with Chapter 3, Using the Network Computer.
Direct connections are specified by your system administrator through the remote configuration file or through Setup. The applicable commands for UNIX systems are Host Connect Method (XDMCP Direct) and XDMCP Server (set to your host). The applicable commands for VMS systems are Host Connect Method (set to VMS), VMS Autologin Transport (set to TDEnet), and VMS Autologin TDEnet Host (set to your host).
Logging In with Telnet
There are two ways to log in through Telnet, depending on whether your system administrator specified a default Telnet host for your network computer. If your network computer displays a Telnet> prompt like Figure 2-8, a default host has not been specified. In this case, you must open a connection before you can log in to the host.

To open a connection to your host computer:
- where hostname is the name or network address of the host.

Once a connection is made (Figure 2-10), either automatically or with the open command, you can log in:
Continue with Chapter 3, Using the Network Computer.
Telnet connection and default Telnet host are specified by the system administrator through the remote configuration file or through Setup. The applicable commands are Host Connect Method (set to Telnet) and Default Telnet Host (set to your host name or address).
Closing a Telnet Window
Press Ctrl-d at the login: prompt to return to the Telnet> prompt without logging in to the computer.
To close the Telnet window from the Telnet> prompt, type quit and press Enter.
Logging In with Cterm
There are two ways to log in through Cterm, depending on whether your system administrator specified a default Cterm host for your network computer. If your network computer displays an NSH> or CTERM> prompt like Figure 2-11, a default host has not been specified. In this case, you must specify a connection before you can log in to the host.

To open a connection to your computer:
- where hostname is the node address of the host.

Once a connection is made (Figure 2-13), either automatically or with the sethost command, you can log in:
Continue with Chapter 3, Using the Network Computer.
Cterm connection and default Cterm host are specified by your system administrator through the remote configuration file or through Setup. The applicable commands are Host Connect Method (set to Cterm) and Default Cterm Host (set to your host address).
Closing a Cterm Window
If you are at the Username: prompt and do not want to log in to the host, wait until the network connection times out and closes. A message appears on the screen when the connection closes. Typically it takes 60 seconds to time out.
To close the Cterm window from the NSH> or CTERM> prompt, type quit or exit and press Enter.
Logging In with the WinDD ICA Client
The WinDD Client screen shown in Figure 2-14 has three areas for server information:
The Server Browsing window contains a list of servers that is automatically generated, as set up by your system administrator. You must connect to a server before you can log in.
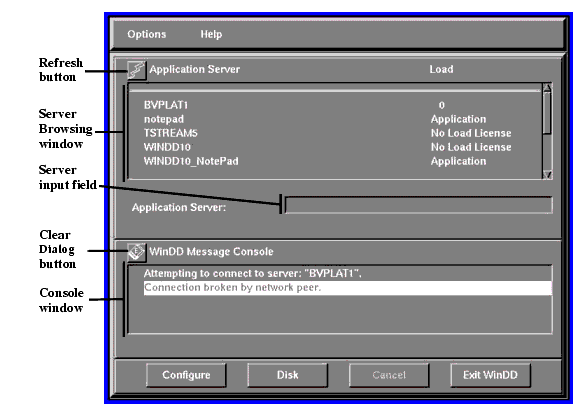
There are two buttons on the WinDD ICA Client screen, a Refresh button for the list of application servers in the top frame and the Clear Dialog button to clear the lower frame.
Note: Additional WinDD information can be found in the topic, WinDD ICA Client on page 5-52 of Chapter 5, Using Advanced Features. Logging in With the WinDD ICA Client
From the WinDD ICA Client screen (Figure 2-14) you must indicate the server you want to connect to before you can log onto the server. There are two ways to do this:
Selecting a Host
There are two ways to select a host server, through ICA broadcast browsing or by command line entry. Select one of the multi-user Windows NT servers (application servers) listed in the top frame of the WinDD clients window. (See Figure 2-14.)
The ICA Broadcast Browser automatically builds a list of the available Windows NT servers on the user's network. This allows you to select a server from the list of multi-user Windows NT servers--you want a server that can provide good performance; usually the one with the lightest load.
Remote Configuration or Command Line Selection
Remote Configuration method. If the server you want to use is listed (this means it has been defined for you by your system administrator), you can simply select it from the WinDD ICA client screen.
If you want to access an application server that is not listed, enter the server's name or its address in the Application Server input field and press Enter.
Next, the software generates a list and places it above the current list. The top list, called the Application Server list, is separated from the other servers in the list by a ===== line.
Command Line Selection. If you start WinDD using xpsh, you can use options on the command line to specify a server you want to access. There are a number of options for this; several of them (-c, -e, -ne, and -h) are explained here:
Use the -h option to add a named application server to the Application Server list. For example, to add the name of a server in the list, enter:
(To add more than one server at a time to the list, put a space between their names.)
Use the -c option to auto-connect to the first server in the Application Server list. If there are no servers in this list, this option is ignored and the software displays the client window.
Use the -e option to enable the Application Server edit field window. This makes it possible for users to add servers to the Application Server list.
Use the -ne option to disable the Application Server edit field window. This means users cannot add servers to the Application Server list.
The system administrator specifies the
WinDD connection, default WinDD host, and Server entries through the remote configuration file or through Setup. The applicable commands are Host Connect Method (set to WinDD), Default Windows NT Server Host (set to your default server address), WinDD Menu Entry (lists Windows NT servers for HostMenu), and WinDD Host Entry (lists additional Windows NT servers for the WinDD client screen).
Setting the WinDD Window Size
From the WinDD ICA client screen, you can easily change your session attributes before you connect to a multi-user Windows NT server.
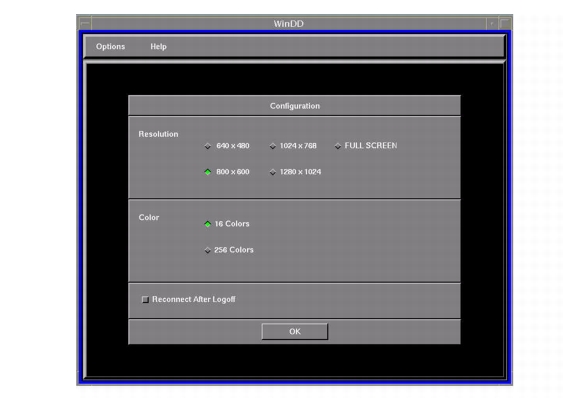
The Configure button brings up the WinDD Configuration dialog illustrated in Figure 2-15. The resolution determines the size and number of colors of the WinDD window. The resolution must be selected prior to making a connection to the application server and cannot be interactively changed until the connection has been closed. The Configure button performs the same function as the Options > Configure command in the pulldown menu.
Logging In
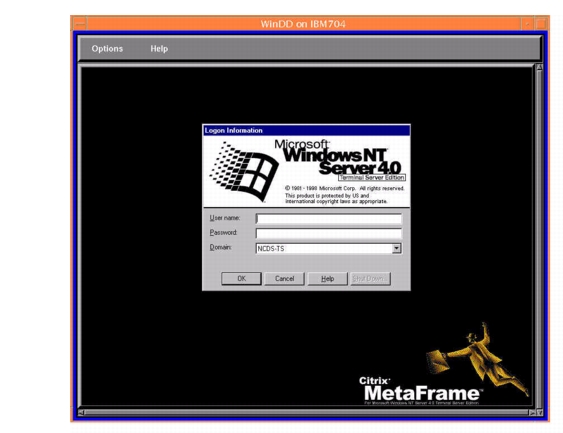
Once you have made a connection, press Ctrl-Alt-Del to bring up the log in screen, shown below in Figure 2-16. If you want to specify a different server or return to the Client screen for any reason, select Options > Server. The Options > Server function switches between the Client screen and the Log in screen after a server connection is made.
Closing a WinDD Session
For Windows NT 3.51 servers, close your Windows NT session as usual, by closing each of your applications, then selecting File > Logoff from the Program Manager.
On Windows NT 4.0 or later servers, close your Windows NT session by closing each of your applications, then select Start > Logoff from the Program Manager.
If auto reconnect is on, the system displays the WinDD log in screen. If auto reconnect is off, the WinDD client screen appears. Select one of these methods to close the WinDD session:
Note: Additional WinDD information can be found in the topic, WinDD ICA Client on page 5-52, of Chapter 5, Using Advanced Features. Logging In with Serial Port 0 or 1
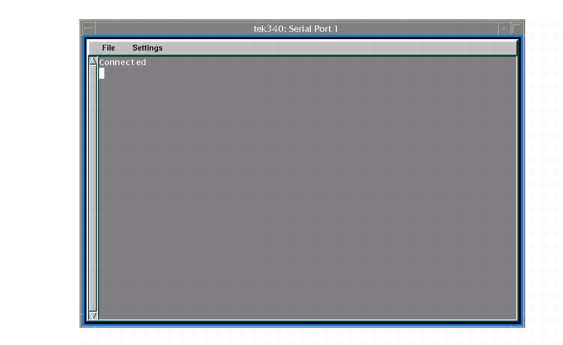
There are several ways to connect to a host through the Serial Port window shown in Figure 2-17. Check with your system administrator to find out which options you can use on your particular network computer.
Use Serial Port 0 or 1 depending on which port your serial cable is plugged into on the back of your network computer logic module.
If you have problems establishing communications, contact your system administrator.
Closing a Serial Port Window
To close a Serial Port window without logging in, press Enter and then type ~. (tilde (~.) followed by a period).
Entering Serial Parameters with Setup
The parameters on the host computer must match the parameters of your network computer's serial ports in order for serial communications to work. Your system administrator can set them up for you in the remote configuration file, or tell you what parameters need to be set so you can enter them in Setup.
To verify or change your serial parameters:
Select Setup from the Client Launcher. If you need a refresher on the terminology in these procedures, refer to Chapter 1, A New Piece of Hardware.
- Drag on the Configuration Summaries menu and release on Peripheral Ports.
- Determine if your cable is connected to Serial Port 0 or 1 by checking the back of the integrated network computer or the separate logic module.
- Verify the parameters for the port are set to the values obtained from your system administrator. Change them if necessary.
- Select the Return to Main Menu button.
- Select the Save Current Settings button.
- Select the Exit Setup button.
Serial Communications with No Protocol
From the Serial Port window pictured in Figure 2-17:
Continue with Chapter 3, Using the Network Computer.
Serial Port connection is specified by the system administrator through the remote configuration file or through Setup. The applicable command is Host Connect Method (set to Serial Port 0 or 1).
Serial Communication via PPP
For communication using Point-to-Point Protocol (PPP), see the PPP support information in PPP Support on page 5-68.
Logging In with LAT
If your network computer displays a LAT> prompt like Figure 2-18, you are set up to log in through a Local Area Transport supported in a DECnet environment. To login, you must connect to a LAT service.

- where service is the name of a valid service.

If it is a password protected service, enter the password at the Password: prompt. You have up to three tries to enter the password before the connection attempt fails.
Once a connection is made (Figure 2-20) you can log in:
Continue with Chapter 3, Using the Network Computer.
LAT connection can be specified by the system administrator through the remote configuration file or through Setup. The applicable command is Host Connect Method (set to LAT).
Closing a LAT Window
If you are at the Username: prompt and do not want to log in to the host, wait until the network connection times out and closes. A message appears on the screen when the connection closes. Typically it takes 60 seconds to time out.
To close the LAT window from the LAT> prompt, type quit or exit and press Enter.