Local Clients
This chapter describes various ways to start a local client. Local clients are those applications that execute on the network computer, rather than on the host, thus reducing network traffic. HostMenu, Telnet, Cterm, and Setup are examples of local clients. Local clients can be started with xpsh, the remote configuration file (xp.cnf), with rsh, or with the Client Launcher.
This chapter also describes the Client Launcher, Audio Server, Authorization Key Manager, and Touchscreen Calibration.
The following local clients are available on the network computer:
Starting Local Clients with xpsh
xpsh is a host program used to download local clients to a network computer. It is a two-way communication mechanism between the host program (xpsh) and the local daemon (xpshd). xpsh sends information to the network computer specifying which local clients to download, and xpsh receives local client error messages and exit information from the network computer. xpsh can download and start local clients.
Starting a client using xpsh enables the client to run locally instead of from the host. The host environment, client name, and arguments are sent to the local network computer. For example, using xpsh to download MWM enables access to files in %HOMEDRIVE%%HOMEPATH%. This allows you to customize the MWM environment for an individual user.
To start a local client using xpsh, enter the appropriate command as explained in the preceding note and in the topics that follow.
Starting the Audio Mixer
- xpsh -display nc_name:0 mixer
Starting the Audio Player
- xpsh -display nc_name:0 aplay
- The following options can be set on the xpsh command line:
-h host specifies the host name or address on which the audio file resides. The host must be entered in the network computer's Internet Host Table in Setup. This host displays in the Audio Player's File Information area.
-f filename and path specifies the audio file name and its entire path. This file displays in the Audio Player's File Information area.
-a access method specifies the access method used to access the audio file. Available access methods are tftp, nfs, and dap.
-v volume level specifies the volume level to use when playing the audio file. Specify a number between 0 and 100, with 0 indicating no volume, and 100 indicating the loudest volume setting.
-p when used with the -h, -f, -a, and -v options, the specified file plays without opening the Audio Player. The entire file plays and cannot be interrupted.
Starting the Authorization Key Manager
- xpsh authkey
The network computer reads the authkey.dat file when booting and updates the network computer and authorization key information. (Be sure that SNMP is available and enabled.)
Starting a Cterm Session
A Cterm session can be started with a Tek220 or Tek340 emulator.
- xpsh -display nc_name:0 tek220 -e cterm
xpsh -display nc_name:0 tek340 -e ctermResource settings can be specified for a Cterm session. Refer to the next section, Specifying Client Resource Settings.
Starting the Digital Video Player
Note: Not available on NC900 Series.
- xpsh -display nc_name:0 vplay
- You can set the following vplay options on the xpsh command line:
- -h host specifies the host name or address on which the video file resides. The host must be entered in the network computer's Internet Host Table in Setup. This host displays in the Video Player's File Information area. When Multicasting, -h specifies the IP address. The port number displays in the Video Player's Addr/Port Information area.
- -f filename and path specifies the video file name and its entire path. This file displays in the Video Player's File Information area. When Multicasting, -f specifies the port number. The address displays in the Video Player's Addr/Port Information area.
- -a access method specifies the method used to access the video file. Available access methods are tftp, nfs, dap, and Multicast. NFS is the preferred file access method for faster and more accurate data transfer rates required by the player. In addition, there is a 16MB limit on files transferred with TFTP.
- -v volume level specifies the volume level to use when playing the video file. Specify a number between 0 and 100, with 0 indicating no volume, and 100 indicating the loudest volume setting.
- -m (Mute) specifies that the video file plays with no sound.
- -c (Color) specifies that the video file displays in color (used only if the video was recorded in color).
- -nc (No Color) specifies that the video file displays in greyscale images.
- -brightness n sets the brightness level of the video file. Specify a number between -50 and +50.
- -contrast n sets the contrast level of the video file. Specify a number between -50 and +50.
- -b (Big) specifies that the video file displays in a frame four times the size of the original file.
- -p (Playonly) when used with the options above, the specified file plays without showing the Video Player. The entire file plays and cannot be interrupted.
- -all (Play All; software player only) plays all frames in a video file. Frame scheduling is ignored and the audio is not put into sync.
- -title "string" -- assigns a title for the vplay windows.
- -propcmd
creates properties that allow other clients to send command strings to the Video Player. These properties cannot be changed or modified and are used to control the Video Player from another client that you create. For details about the properties, see the vplay man page.- -BUFSIZE n
(Hardware Player only) specifies the size of the Video Player's memory buffer (in kilobytes). The value defaults to 1024 and can not be set lower than 1 kilobyte. If the value specified is greater than available memory when trying to play a file, the Video Player reduces its buffer to the available memory.- -CHKSIZE n
(Hardware Player only) specifies that the Video Player's memory buffer is divided into "chunks", measured in kilobytes. The network fills the chunks, and the Video Player empties them as they are accessed. The default is 32, which divides the buffer into 32 kilobyte chunks. If the chunk size is set to a number larger than the buffer size, the chunk size is truncated to one half the buffer size. The chunk size cannot be set less than 1 kilobyte.-CHKDELAY n
(Hardware Player only) specifies the time delay (in milliseconds) that the Video Player waits following each read request that fills a chunk.-chan n
(Multicast only) specifies an index into an array of available Multicast channels. Do not use with the -h, -f, -a, or -text options.-text "string"
(Multicast only) specifies the channel string to be displayed by the Video Player. Do not use with the -chan option.Starting a LAT Session
A LAT session can be started with a Tek220 or Tek340 emulator.
- xpsh -display nc_name:0 tek220 -e llogin
xpsh -display nc_name:0 tek340 -e lloginResource settings can be specified for a LAT session. Refer to the next section, Specifying Client Resource Settings.
Starting the Local Client Launcher
- xpsh -display nc_name:0 launcher
The following options can be added to the xpsh command line when starting the Client Launcher:
-auto configures the Client Launcher with the automatic default settings even if a configuration file exists.
-file filename configures the Client Launcher using a user-defined configuration file.
Starting Local MWM
- xpsh -display nc_name:0 mwm
Note: If both MWM version 1.1 and MWM version 2.0 are authorized, the 2.0 version starts. In this case, to start version 1.1, use mwmv1 instead of mwm in the command. Starting Local Netscape NC Navigator
All NCD Network Computers come authorized to run the local Netscape NC Navigator browser which ships with NCBridge. Additional memory may be required, however.
NCD recommends that the network computer have at least 48MB of system memory for running the local browser. You can start the local browser in either kiosk mode (see the Kiosk Mode topic in the NCBridge Reference Manual) or by using xpsh. For example, after logging in, use one of these commands to start the local browser:
- xpsh -display displayname:0.0 -access xpsh netscape
- xpsh -display displayname:0.0 -access xpsh netscape_lite
These commands assume that xpsh is in the user's search path. The default location is C:\NCBridge\tekxp\bin\nt. You must use the
-display displayname:0.0 command line option, where "displayname" is the IP address or hostname of the NC. If connected to an NT host using the local ICA client, use "-display %CLIENTNAME%:0.0". See both the NCBridge User Manual and the NCBridge Reference Manual for additional details on running the local browser.Starting a Serial Session for Port 0 and Port 1
A serial session can be started with a Tek220 or Tek340 emulator for port 0 or port 1.
- xpsh -display nc_name:0 tek220 -e tip tty0
- xpsh -display nc_name:0 tek340 -e tip tty1
Starting Setup
- xpsh -display nc_name:0 setup
A network computer's Setup and Console window can also be started and displayed on a remote network computer or host using xpsh. Once started, you can use Setup to configure network computer settings, establish communication connections, and monitor network computer operations.
To access a network computer's Setup from a remote network computer or host using C shell, enter:
setenv TEKSETUP_DISPLAY display_device:0
If using a different type of shell tool, enter:
- xpsh -display nc:0 -xpenv "TEKSETUP_DISPLAY=display_device:0" setup
where nc is the remote network computer whose Setup and Console window is accessed, and display_device is the network computer or host where Setup is to display. Use IP addresses if the remote network computer does not know the host name of the display device (set up in the Internet Host Table in Setup).
To access a network computer's Console window from a remote network computer, first display the remote NC Setup window on your NC as described earlier in this topic. Then click the Network Tables and Utilities button and select Console from the drop-down menu to open the Console window.
If the network computer user currently has Setup started, it is not accessible remotely via xpsh. Likewise, if a remote network computer or host has Setup open via xpsh, it is not available to the network computer user.
Note: To prevent other users from accessing your network computer's Setup and resetting the server, set enable_access_control to Yes (in either the xp.cnf file or in Setup). Starting Teemx 3270E/5250 Emulators
- xpsh -display nc_name:0 teemx
See the Teemx 3270E/5250 User Manual on the Documentation CD-ROM for details.
Starting a Telnet Session
A Telnet session can be started with a Tek220 or Tek340 emulator.
- xpsh -display nc_name:0 tek220 -e telnet
xpsh -display nc_name:0 tek340 -e telnetResource settings can be specified for a Telnet session. Refer to the next section, Specifying Client Resource Settings.
Starting WinDD
xpsh can start the WinDD ICA client as needed. To start the WinDD ICA client with xpsh, enter the following (where nc_name is the name or address of your network computer):
- xpsh -display nc_name:0 windd [options]
The following options can be set on the xpsh command line:
- -display nc:0
Specifies the nc name or address to display the WinDD local client.- -c Auto-connect to the first application server in the application server list. If there are no application servers in the list, this option is ignored and the client window is displayed.
- -nc Do not auto-connect to an application server. (Default)
- -d Displays the menu bar and the internal borders. (Default)
- -nd Does not display the menu bar or the internal borders. For example, this allows a 1280x1024 WinDD window to fully display on a 1280x1024 monitor (minus windows manager decorations).
- -e Enables the Application Server edit field window so that users can add application servers to the application server list. (Default)
- -ne Disables the Application Server edit field window so that users are not allowed to add application servers to the application server list.
- -floppy
Allows supported host versions of WinDD to use its local floppy drive as a network connected drive for the Application Server. Only the first host client to specify this option is allowed to use the floppy device. Note, this is for host clients (with local floppy drive) only.- -no_floppy_cache
Disables use of local floppy write cache. This is a fail-safe option to ensure the entire file has been updated in the event a user suddenly ejects a disk mechanically (when disks are ejected via the GUI button, that process flushes the cache so no information is lost).- -geometry <geometry>
Standard X11 geometry option, <WidthxHeight+X+Y>.- -h <application server>
Adds the named application server(s) to the application server list. Multiple application servers can be added to the list by listing them separated by spaces.- -help
Displays a brief help list on the available WinDD command-line options.- -initprog <prog> [-initdir <dir>]
Specifies the application to execute upon application server login. The login session is terminated when the application is terminated.- Prog specifies the application and can also specify its path (up to 259 characters) and parameters. The program path and name are written consecutively (and not separated by a space) when they are both specified in prog. A space separates the program name and its parameters. These parameters are program specific and can specify program settings or data files to invoke on execution. Dir specifies the path of the executable program.
- -keysym_only
Specifies that all NCD network computer keyboards are supported with keysym translations within WinDD.- -local_numlock
Specifies that WinDD manages the state of the Num_Lock independent of any X server support.- -no_auto_numlock
Specifies that WinDD does not control the Num_Lock setting.- -login <username> [-pass <passwd>] [-domain <domainname>]
Specifies the application server user account login name, login password, and domain. These values are used for user account verification.- When using a WinDD client and connecting to a WinDD application server, your username, password, domain, initial program, and initial directory are encrypted as they are sent across the network.
- Username, password, domainname, dir, and prog are not viewable or changeable from the WinDD configuration window.
- -r Reconnect to the application server after log off.
- -nr Does not reconnect to the application server after log off. (Default)
- -version
Displays the WinDD version in use. (If the license is 8019, this option also prints For evaluation purposes only.)- -x Exits the WinDD client upon logging out of, or disconnecting from, the application server.
- -nx Does not exit the WinDD client upon logging out of, or disconnecting from, the application server. (Default)
- -force_xcursor
Specifies that monochrome pointers within the WinDD desktop are to be implemented using X cursors. Some monochrome pointers are xor'd with the underlying desktop. When this switch is specified, it is no longer xor'd, as X cursors do not support that mode.Starting Xlock
- xpsh -display nc_name:0 xlock -mode <mode>
where <mode> is an optional setting. If set to 1, Xlock locks the keyboard only. If set to 0, Xlock locks the keyboard and the screen. If a mode setting is not given, Xlock locks the keyboard and the screen by default.
A password is required to use the Xlock client. The same password is used throughout the entire session. If while using Xlock you forget the password, you must reboot the network computer or reset the server (in Setup) to clear the password and unlock the keyboard and screen.
Starting Local XP Window Manager
- xpsh -display nc_name:0 xpwm
Starting Local Clients in the xp.cnf File
Using the start and/or preload commands in the remote configuration file (xp.cnf), you can determine which local clients are downloaded and/or started at boot time. The specified clients are loaded into the network computer's memory and remain there until started. Even after closing the client, it remains in RAM so that it can be restarted again. For information about starting local clients from the remote configuration file, refer to the start and preload commands in Chapter 2, Remote Configuration in the NCBridge Reference Manual.
Starting Local Clients with rsh
rsh is a host program used to download local clients to a network computer. rsh sends information to the network computer specifying which local clients to download, however, unlike xpsh, rsh does not receive local client error messages and exit information from the network computer.
Security for rsh is set through the .rhosts file. If user security is not set in the .rhosts file, then users are able to access all local clients. The rshd_security command in the remote configuration file (xp.cnf) is used to determine whether users can override the security features set by the system administrator.
Enabling rsh
Before starting local clients with rsh, you must first enable it. To do this, use the start command with the parameter RSHD in the remote configuration file (xp.cnf):
- start RSHD Yes
Editing the .rhosts File
The .rhosts file is used to authenticate user requests to execute local clients. Entries are either positive or negative, depending on the permissions you want to give users. Positive entries enable user to access the specified local clients; negative entries deny access. The entries should include the hostname, username and client name. The order of entries within the files is important. If the file contains both positive and negative entries, the entry that appears first takes precedence.
Examples
For example, the entry below allows user judyl access to the Setup and Client Launcher clients while logged into the host Sierra:
- sierra judyl +setup +launcher
If you do not list specific clients, then all clients are available to the specified user:
- sierra judyl
A negative entry means that the client is not available to the user, but all other clients are. For example, user judyl cannot access the Digital Video Player or the Audio Player, but can access any of the other available clients:
- sierra judyl -vplay -aplay
You can also use the positive and negative specification for hostname and usernames. In the following example, user paulb can access all clients from any remote host:
- + paulb
In the next example, any user from any host can access the Setup and Launcher clients:
- + + +setup +launcher
In the final example, user davidb is not allowed access to the Setup and Xlock clients from any host:
- + -davidb +setup +xlock
For details about the .rhosts file, refer to the rhosts man page for your host.
Starting Local Clients with rsh
rsh uses the same local client options as xpsh. When using rsh to start clients, you do not enter the -display environment variable, and you must use the network computer name instead of an address. For example, to start Setup with rsh:
- rsh nc_name setup
For details about starting local clients using rsh, refer to the Starting Local Clients with xpsh section earlier in this chapter and substitute rsh for xpsh and omit the -display environment variable and the :0 in all examples.
Client Launcher
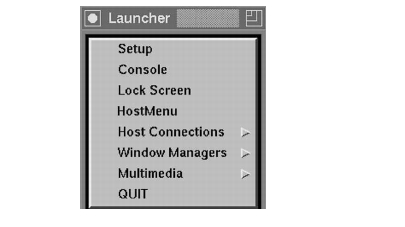
The local Client Launcher allows users to start local clients by simply selecting a client from a menu using the mouse. Figure 4-1 shows a sample Client Launcher menu. The Client Launcher can be configured automatically using default options, or with a customized configuration file. It can be downloaded to the network computer using the remote configuration file (xp.cnf) or using xpsh.
Configuring the Client Launcher
There are two ways to configure the Client Launcher: default automatic configuration, or with a specific configuration file. When the Client Launcher is started, if a user-defined configuration file is not specified, it first searches for a system.launcher configuration file. (A sample system.launcher file is located in \tekxp\boot\config.) If that file is not found, it configures automatically.
Automatic Configuration
If there is no configuration file present, the Client Launcher automatically configures and includes the following clients by default: Telnet, HostMenu, Lock Screen, Console, and Setup. Serial Port 0 and/or 1 are included if the network computer has serial ports. If Motif Window Manager (MWM), TDEnet, LAT, or Tek340 are authorized, they are included as well. The Audio and Video players are included if authorized and if the required hardware is present.
Configuration Files
The configuration files are accessed when the Client Launcher starts, and are used to determine which clients are available to users. There are two different types of configuration files:
- The system.launcher file configures multiple network computers so that the clients available on the Client Launcher are the same for all who use the file. This allows a system administrator to control which clients are available to users.
- A user-defined configuration file customizes the Client Launcher for a user.
To create a configuration file:
- Create a new file, naming it either system.launcher for a system-wide configuration file, or whatever you like for a user-defined file, for example, launch. A sample system.launcher file is located in \tekxp\boot\config.
- Move the new file to the same directory where the xp.cnf file is located. (The default location is \tekxp\boot\config.)
- In the file, use a text editor to enter the main Client Launcher menu name in uppercase letters.
- On subsequent lines, enter each of the clients and submenu names (if used) in double quotation marks to include on the Client Launcher followed by the f.exec or f.menu option:
- f.menu specifies that a submenu is available with additional options. For example, if you have both Motif Window Manager (MWM) and XP Window Manager (XPWM) authorized, you could have a Window Managers entry on the Client Launcher menu that opens a second menu containing MWM and XPWM. You can use any name or description you like in the Client Launcher file with the f.menu option; however, it must end with the string "MENU", for example:
- #"Window Managers f.menu WMMENU
- . . .
- #WMMENU
- #"mwm" f.exec "mwm"
- #"XPWM" f.exec "xpwm"
- #ENDMENU
- f.exec specifies a local client to start immediately upon selecting it. Enter the client name exactly as you would on the xpsh command line, usually with all lower case letters and with double quotation marks. For example, "telnet", "console", "setup", and "mwm".
- The order in which you enter clients and submenus in the configuration file determines the order they appear on the Client Launcher.
- On the last line of the main menu, enter ENDMENU in uppercase letters.
- Create the submenus, if used, by entering the submenu name in all uppercase letters. On subsequent lines, list the clients to include followed by f.exec option in the same manner described in Step 4.
- On the last line of each submenu, enter ENDMENU in uppercase letters.
The Client Launcher menu in Example 4-1 contains the following entries: Sessions (displays a submenu of available session clients), Multimedia (displays a submenu), Console, HostMenu, Window Managers (displays a submenu), and Setup.
- Example 4-1 Sample Client Launcher Configuration File
- # Configuration file for Client Launcher
- #
- MAINMENU
- "Sessions" f.menu SESSIONS
- "Multimedia" f.menu MULTIMEDIA
- "Console" f.exec "console"
- "HostMenu" f.exec "HostMenu"
- "Host Connection" f.menu HOSTMENU
- "Window Managers" f.menu WINDOWS
- "Setup" f.exec "setup"
- "Exit" f.exec "quit"
- ENDMENU
- SESSIONS
- "Serial 0" f.exec "tip -e tip tty0"
- "Telnet 220" f.exec "xterm -e telnet"
- "Telnet 340" f.exec "tek340 -e telnet"
- ENDMENU
- MULTIMEDIA
- "Audio Player" f.exec "aplay -v 50"
- "Digital Video" f.exec "vplay -v 50"
- "Audio Mixer" f.exec "mixer"
- ENDMENU
- WINDOWS
- "MWM" f.exec "mwm"
- "XPWM" f.exec "xpwm"
- ENDMENU
- HOSTMENU
"Netscape Lite" f.exec "netscape_lite"- ENDMENU
In the previous example, the f.exec option immediately starts a client or session, and the f.menu option specifies that a submenu is to appear. The word ENDMENU specifies the end of the menu options.
The main Client Launcher menu contains the MAINMENU entries of the configuration file. When Sessions or Window Managers is selected, the appropriate submenu displays.
Downloading the Client Launcher
The Client Launcher can be downloaded using the remote configuration file (xp.cnf) or with xpsh.
Downloading Using the xp.cnf File
The start command in the xp.cnf file can be set to automatically download and start the Client Launcher when the network computer boots. For information about the start command and available parameters, refer to Chapter 2, Remote Configuration in the NCBridge Reference Manual.
Downloading with xpsh
When downloading and starting the Client Launcher using xpsh, the following options can be set:
- -auto configures the Client Launcher with the automatic default settings even if a configuration file exists.
- -file filename configures the Client Launcher using a user-defined configuration file.
- -geometry x, y configures the position of the Client Launcher. A positive entry (+x, +y) orients from the upper left corner of the display. A negative entry (-x, -y) orients from the lower right corner of the display.
Examples
The following example downloads and starts the Client Launcher with automatic configuration on the network computer sierra:
- xpsh -display sierra:0 launcher -auto
The following example downloads and starts the Client Launcher with automatic configuration on the network computer sierra and positions it 30 pixels from the lower right corner:
- xpsh -display sierra:0 launcher -auto -geometry -30-30
The following example downloads and starts the Client Launcher, configuring its contents using a user-defined file named launch on the network computer sierra:
- xpsh -display sierra:0 launcher -file\ /u1/user3/launch
The following example downloads and starts the Client Launcher, configuring its contents using the system.launcher file on the network computer rocky:
- xpsh -display rocky:0 launcher
The following example starts the Client Launcher with the automatic configuration using the start command in the xp.cnf file:
- start launcher -auto
Using the Client Launcher
Press the Shift and Setup keys simultaneously to display the Client Launcher main menu.
When the Client Launcher is started, it searches for configuration information in the following order:
- In a user-defined configuration file, if specified.
- The system.launcher configuration file.
- If neither configuration file is found, the Client Launcher automatically configures by listing all default and authorized clients.
To open a client listed on the Client Launcher, simply position the mouse pointer on the client name and click the mouse button once. To open a submenu, position the mouse pointer on the menu name. The submenu displays to the right of the Client Launcher main menu (refer to Figure 4-2). Position the mouse pointer an item in the submenu and click the mouse button once.
If the Client Launcher is iconified, pressing the Shift and Setup keys simultaneously displays it again. This is especially useful if the Client Launcher icon is hidden under other open files.
Authorization Key Manager
The Authorization Key Manager enables a system administrator to easily update the authorization keys of several network computers. Authorization keys are used to authorize special options used on the network computer, such as Motif window manager, TDEnet (DECnet), and Teemx 3270E emulator.
Instead of entering each network computer's authorization key one at a time, you can update and maintain them from a central file. The Manager reads the authkey.dat file, which contains the authorization keys for those network computers you want to update with new options. When the file is read, those network computers listed in the authkey.dat file are updated with a new key.
How the Authorization Key Manager Works
The Authorization Key Manager uses SNMP to query specific broadcast addresses and network computers listed in the authkey.dat file, or in the Authorization Key Manager client. Those network computers are then assigned a new authorization key, also listed in the authkey.dat file. Therefore, you must have and enable SNMP.
Setting Up SNMP
In the xp.cnf file, use the snmp_comm_list command to set the community list to public and to allow read and write permissions:
snmp_comm_list "host" public RW
where "host" is the host that performs the GET and SET operations when querying the subnet, public is the community string, and RW indicates read and write permissions.
The authkey.dat File
The authkey.dat file is located in \tekxp\boot\config by default and is empty. Edit the file to contain the broadcast address to query, the network computers to update, and the new authorization keys. The following parameters are used in the authkey.dat file:
- broadcast specify the broadcast address to query using SNMP.
- terminal for each network computer you want to update with a new authorization key, enter its hardware address.
- authorization key For each network computer, enter the authorization key. Each network computer must have a unique authorization key.
The example below shows a sample authkey.dat file:
- broadcast 144.67.33.255
terminal 08:00:34:94:33:EJ JAB(4%>3+[=T;fjqc
terminal 08:46:22:69:47:32 AK)&AMB@.?JTOR&]\
terminal 08:42:90:00:31:69 Jk%3+=]klw\jvv<?!
terminal 08:47:35:69:21:21 Uu$^qvuIi#=/>1GLqStarting the Authorization Key Manager
You can update authorization keys automatically with the xp.cnf file (and the authkey.dat file), or you can open the Authorization Key Manager client. The client provides a user interface where you can enter and delete authorization key and network computer information before updating the authorization keys.
Updating the Authorization Key When Booting
To automatically update authorization keys when booting, edit the xp.cnf file to uncomment the update_authkey command. The network computer reads the authkey.dat file when booting and updates the network computer and authorization key information. (Be sure that SNMP is available and enabled.)
Starting the Authorization Key Manager Client with xpsh
Use xpsh to open the Authorization Key Manager client as shown in Figure 4-1. The client's interface allows you to add and delete information from the authkey.dat file, and to force the authkey.dat file to be read without having to reboot the network computer.
To start the client with xpsh, enter this command:
- xpsh authkey
Using the Authorization Key Manager Client
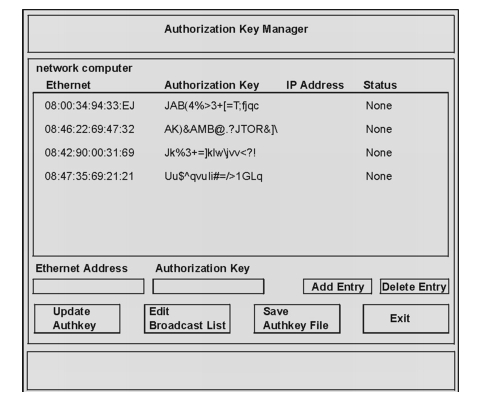
The Authorization Key Manager client can be started only with xpsh. When it starts, the window shown in Figure 4-2 appears.
The Authorization Key Manager window shows the ethernet addresses and authorization keys as listed in the authkey.dat file. Before updating authorization keys, you can add and delete information in this window. This information is read in addition to the entries in the authkey.dat file. The following topics are discussed:
- Adding and Deleting Network Computer Information
- Editing the Broadcast List
- Updating Authorization Keys
- Saving the authkey.dat File
Adding and Deleting Network Computer Information
The Authorization Key Manager window contains network computer information necessary for updating authorization keys. If you have information in the authkey.dat file, it displays in this window.
- To delete an entry, select the information to delete with the mouse and it prefills in the Ethernet Address and Authorization Key fields. Then select Delete Entry.
- To add an entry, enter its ethernet address in the Ethernet Address field, and its new authorization key in the Authorization Key field and select Add Entry.
To apply your changes to the authkey.dat file, refer to Saving the Authkey File.
Editing the Broadcast List
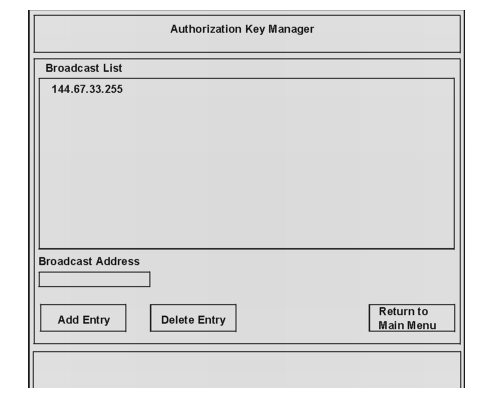
The Authorization Key Manager searches the specified broadcast address for those network computers that match the ethernet addresses listed in the authkey.dat file. To view and or edit the broadcast list, select the Edit Broadcast List button. The window shown in Figure 4-3 appears.
This window lists the broadcast addresses that the Authorization Key Manager client searches when updating authorization keys. You can add and delete information in this window. Information in this window is read in addition to the entries in the authkey.dat file.
- To add a broadcast address, enter the address in the Broadcast Address field and select Add Entry.
- To delete an address, select the address to delete with the mouse, and then select Delete Entry.
To apply your changes to the authkey.dat file, refer to Saving the Authkey File.
Updating Authorization Keys
When the correct information is in the Authorization Key Manager window, select the Update Authkey button. The authorization keys are updated for those network computers listed.
The update status for each network computer is displayed as either Successful or Unreachable. If the status is Unreachable, check that you entered the correct ethernet and authorization key information. Make sure also that you have SNMP enabled.
Saving the Authkey File
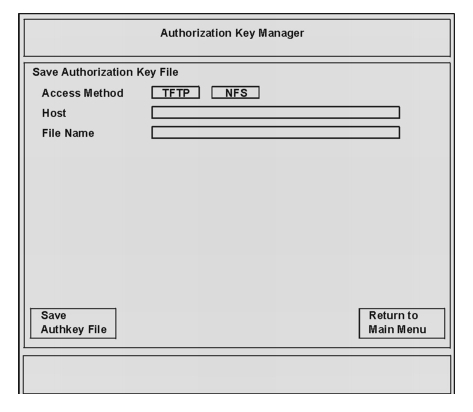
After making changes to the ethernet addresses, authorization key, or broadcast information, you can save those changes to the authkey.dat file. To save changes, select Save Authkey File. The window shown in Figure 4-4 appears.
Note: If you use TFTP as the access method, the file authkey.dat must already exist and have world write permissions.
- Enter the host name on which the authkey.dat file is located.
- Enter the path and file name to which the information is to be saved.
- Select the Save Authkey File button to save the information in the Authorization Key Manager client to the authkey.dat file.
- Select Return to Main Menu to exit the Save Authkey File window.
Touchscreen Calibration Client
The Trident Touchscreen Calibration Client enables you to calibrate the touchscreen. The Calibration Client is shown in Figure 4-5.
To invoke the Calibration Client, first map it to a keysym using the keysym_action_entry command. For example, to invoke the client with the F1 key, enter the following in the xp.cnf file:
- keysym_action_entry F1 TOUCH_CALIBRATE ALL
Touchscreen jitter can be controlled with the touchSc_Jitter command:
- touchSc_Jitter 4 # touch screen jitter control
In this example, the 4 indicates that a change of less than 5 pixels when touching the screen does not cause the cursor to move.
The Calibration Client includes the following elements:
Note: Not all elements are available on all touchscreen devices. Only those elements needed for your touchscreen appear. Up Threshold controls the touch up threshold
Down Threshold controls the touch down threshold
Jitter Control controls the jitter and SAW touchscreen pressure threshold
OutOfBounds Data controls the out of bounds data
Normal Mode controls the different touch modes. The available modes are:
- Normal Mode: user touching the screen generates a button press; user dragging his finger generates a button press motion (like pressing the mouse button and dragging the mouse), user lifting his finger generates a button release event.
- Point Mode: user touching the screen generates a button press and release event immediately.
- Tap Mode: allows the touchscreen to operate like a mouse. The user touching the screen generates a motion event allowing the user to drag the cursor around the screen (like moving the mouse). Lifting his finger from the screen and touching the screen again within a predefined time limit (about 1/4 second) causes a button press event (like pressing a mouse button). The user can now move his finger around the screen causing button press motion events (like pressing the mouse button and moving the mouse simultaneously). Removing his finger from the screen generates a button release event (like releasing the mouse button).
- Release Mode: creates motion events as the user touches the screen and drags his finger. When the user removes his finger, a button press event is generated, followed immediately by a button release event.