Installing the Software
The first step is to install the NCBridge software on one or more hosts. The network computer plugs directly into the network, so you can install the software on one host or distribute it across different hosts on the same network.
The media contains all of the files you need to boot and configure your network computers. With the INSTALL script you can install everything or select only the files you need for your environment.
- # umask 022
This manual provides detailed installation information but first, a quick-start list is provided as an overview. It is also useful for experienced users who don't need a lot of detail.
Installing NCBridge Over Previous Versions
Note: See the Discontinued Software Features topic on page xiv of the Preface. When installing NCBridge 4.0 over an exisiting version the discontinued features (see the list in the Preface) are removed during installation. If you wish to have any of these features supported on older platforms, install NCBridge 4.0 in a separate directory.
Quick Start
The following steps provide an overview describing how to install NCBridge on the host and to configure an NC for operation. Details can be found in the remainder of this manual and in the NCBridge Reference Manual.
NCBridge Installation
- Log on to installation host.
- Insert the installation CD-ROM into the host CD-ROM drive. Set the mount point and path (for details, see Installing from a CD-ROM Drive).
- Extract the INSTALL script (see Extracting the INSTALL Script for details).
- Run the install script. Choose the options you wish to install as you are prompted. Choose options as they apply to your system. The remainder of this chapter covers many different Unix platforms (i.e., Sun, IBM, HP, etc.).
- Configure the fonts for your workstation. This is a common source of installation problems. There are two methods for configuring fonts.
Font Setup
Providing access to the correct fonts is key to the function and appearance of windows on the NC's display. Font access is most easily done by matching the NC fonts to the fonts used by other X window workstations. For example, if you normally run an application on a Solaris workstation, then ensure the fonts used by the NC match the Solaris workstation's fonts.
Note: To see if a font server is running, issue the following command at the Unix prompt:
- > usr/ucb/ps -axu | grep xfs
Method 1
On Sun Solaris workstations, a font server is started by default on port 7100. See the man page on "xfs" to configure a font server if one is not already started.
Method 2
- Determine the fonts used by the Unix workstation running X11 you're trying
to simulate by entering the command xset -q -display <IP_ADDRESS:0.07>. A list of fonts and paths similar to the ones in this list will appear (these commands are generic for all workstations):- Enter the path information obtained in the previous step into the fonts.tbl file in the /tekxp/boot/config directory.
- Using nfs boot, the boot and font directories need to be exported for file sharing. See Chapters 3 - 8 for details regarding your specific system.
- Set up the terminal for nfs file sharing. File sharing allows the terminal to have nfs access to font files listed in the fonts.tbl file. Do this by adding the following to the nfs_table entry in the xp.cnf file for the terminal:
nfs_table "<file_system_name>" "<local_directory>" "<transfer_size>". <file_system_name> is the remote host path specified by either name or IP address and path, <local_directory> is the local path specification and <transfer_size> is the byte size for transfers. The following is a typical example:See the NCBridge Reference Manual for more details.
Note: With newer versions of Unix on our supported workstations, it is recommended to configure NCBridge to use the fonts provided by the Unix vendor. Network Computer Terminal Installation
- Unpack the NC hardware and assemble according to Installation Guide provided.
- Turn on the NC.
- When the boot screen appears, press the spacebar to stop the boot process. This allows you to enter basic boot parameters at the boot screen.
- Set the following items:
IA <IP address of NC>
IH <IP address of boot host>
IM <subnet mask>
BP </installation_directory/tekxp/boot/os.900>
IGate <IP address of gateway host>
NVS (to save settings in NVRAM)
B (to start boot process)This table shows installation directory paths and file names:
- The network computer should boot for basic operation. Make custom changes to the installation, as desired.
- After booting, a HostMenu window should appear, showing a list of available hosts.
Note: If you do not want to manually set addresses, you can use the bootp protocol. See the Enable BOOTP topic for your host computer in Chapters 3-8 of this manual. Media Contents
The directory hierarchy is created relative to the current directory. For example, if you are at the root partition (/), the INSTALL script creates the directory
/tekxp, if you are at the /usr partition, the directory would be /usr/tekxp. For consistency throughout the manuals, the install directory is assumed to be
/tekxp. The directory hierarchy is illustrated in Figure 1-1.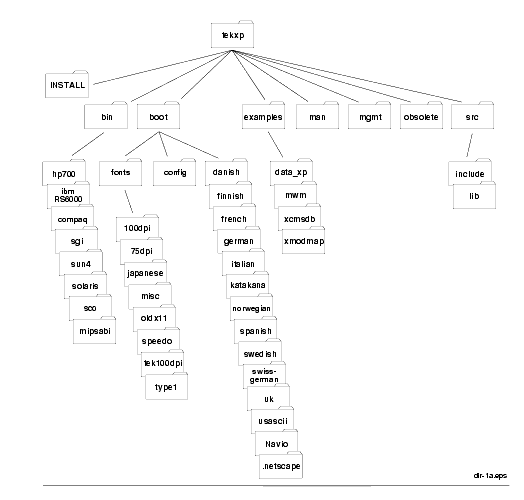
Figure 1-1 Directory Hierarchy
Here are the standard installed directories:
- /tekxp/INSTALL
Contains the installation scripts and the installation log files.- /tekxp/bin/<host>
Contains one or more host subdirectories containing network computer-specific executables for font conversion, hardcopy, and communications.- /tekxp/boot
Contains the boot files, boot fonts, local clients, and configuration files. For files that differ between network computer models, the format file.model is used. Refer to Table 1-8 for model information.- /tekxp/boot/config
Contains the network computer configuration files (xp.cnf and .tbl files).- /tekxp/boot/fonts
Contains subdirectories for the supplied non-resident fonts.- /tekxp/boot/<language_directory>/app-defaults
Contains translated text for network computer clients.- /tekxp/examples
Contains examples of resource files, such as Xsession and Xresources. There are subdirectories containing sample files for data_xp, mwm, and xcmsdb and keyboard mapping files for use with 7 bit national character sets.- /tekxp/man
Contains on-line manual pages for many of the binaries in /tekxp/bin/<host>- /tekxp/mgmt
Contains a sample SNMP MIB file.- /tekxp/src
Contains source files for various utilities.Installing NCBridge
The following sections explain installation considerations, preparations, and script extraction for the different hosts on which you can install NCBridge:
Notes: Linux is a generic version of Unix. When installing on platforms that are not listed, such as Linux, use the generic installation files. Sun Installation
This section describes installing NCBridge on Sun hosts. It includes installation considerations, preparing for the installation, installing NCBridge, and extracting the INSTALL script.
Installation Considerations
The binary files in the directory /tekxp/bin/sun4 support Sun hosts running SunOS versions 4.1.3 or greater (referred to as SunOS 4 in this manual). The binary files in the directory /tekxp/bin/solaris support Sun Sparc hosts running Solaris 2.3 or greater, (referred to as SunOS 5 in this manual).
Before you install the tape, there are two topics you need to consider:
The following sections describe the general considerations. If you need more in-depth or introductory information, refer to your Sun documentation.
NFS Boot Security
If you are planning to boot via NFS, the installation directory must be exported so the network computer can access the boot files. Select an installation directory tree that does not contain secured or proprietary information. For example, you may wish to install files under the directory /usr/tekxp instead of /tekxp. Thereby exporting the /usr partition (or just /usr/tekxp) instead of the root partition (/).
Secure tftp
There are considerations to make if the boot or font host uses secure tftp. (See the Enabling TFTP topics on page 4-4 and page 5-3.) To determine if you use secure tftp, check the file /etc/inetd.conf for a line similar to:
- tftp dgram udp wait root /usr/etc/in.tftpd in.tftpd -s /tftpboot
The -s indicates the host is using secure tftp. The partial path name following the -s is the secure path (the only path searched for files used in tftp transfers).
If you are using secure tftp, note the secure directory at the end of the line. Use this directory as the parent directory for /tekxp.
Secure tftp does not follow symbolic links to files outside the secure directory, so all boot and configuration files must share a common parent directory. For example, you cannot link the file /tftpboot/tekxp/boot/config/xp.cnf to /usr/tekxp/xp.cnf. However, it is possible to symbolically link the secure directory to another partition if disk space is limited in the secure directory. For example, /tftpboot/tekxp could be linked to /usr/tftpboot/tekxp. Refer to your host documentation.
Preparing for Installation
Note: If you are not logged in as root, you are not be able to overwrite files from a previous installation.
- Use Table 1-2 to calculate the approximate size of the files you need to install. Use df to make sure you have enough disk space in the partition where you want to install the files. If not, select another partition that has enough space, like /usr, or increase the size of the logical volume.
- # df
Installing from a CD-ROM Drive
Extracting the script is only required for the initial installation. The script can be reused to extract additional files or to re-install the software.
- Insert the CD-ROM into the drive. Use cd to change to the parent directory (must have world read and execute privilege). This is where the INSTALL script builds the tekxp directory tree. A typical installation requires about 80 MB of free space.
- You need to know the mount point and path for your CD-ROM drive. If a mount point does not exist, create a directory named cdrom to be used as the mount point for the CD-ROM by entering the following command:
- Enter the command to mount the CD-ROM to the /cdrom directory: If you are running an automounter, this step is not necessary.
- For Sun4:
- mount -t hsfs -r /dev/sr0 /cdrom
- The -t indicates the file system type (hsfs), the -r indicates the contents are read-only, and /dev/sr0 is the device name.
- For Sun5:
- mount -F hsfs -r /dev/sd6c /cdrom
- The -F indicates the file system type (hsfs), the -r indicates the contents are read-only, and /dev/sd6c is the device name.
- You need to know the mount point and path for your CD-ROM drive. Defaults are shown in the extraction examples. For a Sun OS system, extract the INSTALL script with the command:
Note: For a Solaris system, use this command to extract the INSTALL script:
- tar -xvpf /cdrom/ncbridge_version_4_0/sun/install.tar
Extracting the INSTALL Script
You only need to extract the INSTALL script for your initial installation, as the script can be reused for subsequent installations. To extract the script:
- Use cd to change to the parent directory. This is where the INSTALL script builds the tekxp directory tree. The parent directory should have world read and execute privileges. For this example, we are using the root partition:
- Insert the media into the drive.
- You need to know the path and name of your CD-ROM device. The default CD-ROM <device> for Sun CD-ROMs is /dev/cdrom. Extract the INSTALL script with the command:
After extracting the INSTALL script, continue to Using the INSTALL Script on page 1-31.
IBM Installation
This section describes installing NCBridge on IBM hosts. It includes installation considerations, preparing for the installation, installing NCBridge, and extracting the INSTALL script.
Installation Considerations
NFS Boot Security
If you are planning to boot via NFS, the installation directory must be exported so the network computer can access the boot files. Select an installation directory tree that does not contain secured or proprietary information. For example, you may wish to install files under the directory /usr/tekxp instead of /tekxp. Thereby exporting the /usr partition instead of the root partition (/).
If you need more in-depth or introductory information, refer to your IBM host documentation.
There are considerations to make if the boot or font host uses secure tftp.
To determine if you use secure tftp, check the file /etc/inetd.conf for a line similar to:
- tftp dgram udp wait root /usr/etc/in.tftpd in.tftpd -s /tftpboot
Preparing for Installation
Note: If you are not logged in as root, you are not be able to overwrite files from a previous installation.
- Use Table 1-4 to calculate the approximate size of the files you need to install. Use df to make sure you have enough disk space in the partition where you want to install the files. If not, select another partition that has enough space, like /usr, or increase the size of the logical volume.
- # df
Installing from a CD-ROM Drive
Extracting the script is only required for the initial installation. The script can be reused to extract additional files or to re-install the software.
- Insert the CD-ROM into the drive. Use cd to change to the parent directory (must have world read and execute privilege). This is where the INSTALL script builds the tekxp directory tree. A typical installation requires about 80 MB of free space.
- You need to know the mount point and path for your CD-ROM drive. If a mount point does not exist, create a directory named cdrom to be used as the mount point for the CD-ROM. Create the mount point with SMIT. To add access to a local drive:
- Enter the command to mount the CD-ROM to the /cdrom directory: If you are running an automounter, this step is not necessary.
- You need to know the mount point and path for your CD-ROM drive. Extract the INSTALL script with the command:
After extracting the INSTALL script, continue to Using the INSTALL Script on page 1-31.
Hewlett-Packard Installation
This section describes installing NCBridge on Hewlett-Packard hosts. It includes installation considerations, preparing for the installation, installing NCBridge, and extracting the INSTALL script.
The binary files in the directory /tekxp/bin/hp700 support Series 700 and 800 hosts.
Installation Considerations
NFS Boot Security
If you plan to boot via NFS, you must export the directories that contain the network computer software before you load the installation media. Use SAM to export and create the selected boot and install directories. When selecting a boot and install directory, create a tree structure that does not contain secured or proprietary information. For example, you may wish to install files under the directory /usr/tekxp instead of /tekxp. Thereby exporting the /usr partition instead of the root partition (/).
There are considerations to make if the boot or font host uses secure tftp.
To determine if you use secure tftp, check the file /etc/inetd.conf for a line similar to:
- tftp dgram udp wait root /usr/etc/in.tftpd in.tftpd -s /tftpboot
Preparing for Installation
Note: If you are not logged in as root, you are not be able to overwrite files from a previous installation.
- Use Table 1-4 to calculate the approximate size of the files you need to install. Use df to make sure you have at enough disk space in the partition where you want to install the files. If not, select another partition that has enough space, like /usr, or increase the size of the logical volume.
- # df
- or from the SAM menu:
- File Systems->
Status Operations->
View Disk Space InformationInstalling From a CD-ROM Drive
Extracting the script is only required for the initial installation. The script can be reused to extract additional files or to re-install the software.
- Insert the CD-ROM into the drive. Use cd to change to the parent directory (must have world read and execute privilege). This is where the INSTALL script builds the tekxp directory tree. A typical installation requires about 80 MB of free space.
- You need to know the mount point and path for your CD-ROM drive. If a mount point does not exist, create a directory named cdrom to be used as the mount point for the CD-ROM by entering the following command:
- Enter the command to mount the CD-ROM to the /cdrom directory: If you are running an automounter, this step is not necessary.
- You need to know the mount point and path for your CD-ROM drive. Defaults are shown in the extraction examples. Extract the INSTALL script with the command:
Note: To use NFS as a file access method, use SAM to export the boot_directory (/tekxp/boot) before running the script. After extracting the INSTALL script, continue to Using the INSTALL Script on page 1-31.
Silicon Graphics Installation
This section describes installing NCBridge on Silicon Graphics hosts. It includes installation considerations, preparing for the installation, installing NCBridge, and extracting the INSTALL script.
Installation Considerations
The following sections describe the general considerations. Your Silicon Graphics operating system version should be 4.0.5 or higher. If you need more in-depth or introductory information, refer to your Silicon Graphics IRIS System Administration Guide.
NFS Boot Security
If you are planning to boot via NFS, the installation directory must be exported so the network computer users can access the boot files. Select an installation directory tree that does not contain secured or proprietary information. For example, you may wish to install files under the directory /usr/tekxp instead of /tekxp. Thereby exporting the /usr partition instead of the root partition (/).
Secure tftp
There are considerations if the boot or font host use secure tftp. To determine if you use secure tftp, check the file /etc/inetd.conf for a line similar to:
- tftp dgram udp wait guest /usr/etc/tftpd tftpd -s /usr/local/boot
The -s indicates the host is using secure tftp. The partial path name following the -s is the secure path.
Secure tftp does not follow symbolic links to files outside the secure directory, so all boot and configuration files must share a common parent directory. For example, you cannot link the file /tekxp/boot/config/xp.cnf to /usr/tekxp/boot/config/xp.cnf. However, it is possible to symbolically link the secure directory to another partition if disk space is limited in the secure directory. For example, /tekxp could be linked to /usr/tekxp. Refer to your host documentation.
Preparing for Installation
Note: If you are not logged in as root, you are not be able to overwrite files from a previous installation.
- Use Table 1-5 to calculate the approximate size of the files you need to install. Use df to make sure you have enough disk space in the partition where you want to install the files. If not, select another partition that has enough space, like /usr, or increase the size of the logical volume.
- # df
Installing From a CD-ROM Drive
Extracting the script is only required for the initial installation. The script can be reused to extract additional files or to re-install the software.
- Insert the CD-ROM into the drive. Use cd to change to the parent directory (must have world read and execute privilege). This is where the INSTALL script builds the tekxp directory tree. A typical installation requires about 80 MB of free space.
- You need to know the mount point and path for your CD-ROM drive. If a mount point does not exist, create a directory named cdrom to be used as the mount point for the CD-ROM by entering the following command:
- Enter the command to mount the CD-ROM to the /cdrom directory: If you are running an automounter, this step is not necessary.
- You need to know the mount point and path for your CD-ROM drive. Defaults are shown in the extraction examples. Extract the INSTALL script with the command:
After extracting the INSTALL script, continue to Using the INSTALL Script on page 1-31.
Compaq Tru64 Unix Installation
This section describes installing NCBridge on Compaq Tru64 Unix hosts. It includes installation considerations, preparing for the installation, installing NCBridge, and extracting the INSTALL script.
The files for Compaq hosts running Tru64 Unix are in the directory
/tekxp/bin/compaq.Installation Considerations
NFS Boot Security
If you plan to boot via NFS, you must export the directories that contain the NCBridge network computer software before you load the installation media. When selecting a boot and install directory, create a tree structure that does not contain secured or proprietary information. For example, you may wish to install files under the directory /usr/tekxp instead of /tekxp. Thereby exporting the /usr partition instead of the root partition (/).
Secure tftp
There are considerations if the boot or font host use secure tftp. To determine if you use secure tftp, check the file /etc/inetd.conf for a line similar to:
- tftp dgram udp wait /usr/etc/tftpd tftpd -r /tftpboot
The -r indicates the host is using secure tftp. The partial path name following the -r is the secure path (the only path searched for files used in tftp transfers).
If you are using secure tftp, note the secure directory at the end of the line. Use this directory as the parent directory for /tekxp.
Secure tftp does not follow symbolic links to files outside the secure directory, so all boot and configuration files must share a common parent directory. For example, you cannot link the file /tftpboot/tekxp/boot/config/xp.cnf to /usr/tekxp/xp.cnf. However, it is possible to symbolically link the secure directory to another partition if disk space is limited in the secure directory. For example, /tftpboot/tekxp could be linked to /usr/tftpboot/tekxp. Refer to your host documentation.
Preparing for Installation
Note: If you are not logged in as root, you are not be able to overwrite files from a previous installation.
- Use Table 1-6 to calculate the approximate size of the files you need to install. Use df to make sure you have at enough disk space in the partition where you want to install the files. If not, select another partition that has enough space, like /usr, or increase the size of the logical volume.
- # df
Installing From a CD-ROM Drive
Extracting the script is only required for the initial installation. The script can be reused to extract additional files or to re-install the software.
- Insert the CD-ROM into the drive. Use cd to change to the parent directory (must have world read and execute privilege). This is where the INSTALL script builds the tekxp directory tree. A typical installation requires about 80 MB of free space.
- You need to know the mount point and path for your CD-ROM drive. If a mount point does not exist, create a directory named cdrom to be used as the mount point for the CD-ROM by entering the following command:
- Enter the command to mount the CD-ROM to the /cdrom directory: If you are running an automounter, this step is not necessary.
- You need to know the mount point and path for your CD-ROM drive. Defaults are shown in the extraction examples. Extract the INSTALL script with the command:
After extracting the INSTALL script, continue to Using the INSTALL Script on page 1-31.
Generic Unix Installation
This section describes installing NCBridge on Generic Unix hosts. It includes installation considerations, preparing for the installation, installing NCBridge software, and extracting the INSTALL script.
The media contains all of the files you need to boot and configure your network computers. With the INSTALL script you can install everything or select only the files you need for your environment The generic files can also be installed without using the INSTALL script.
Note: Examples in this chapter are based on a Sun Sparcstation2 running SunOS. Installation Considerations
Before you install the tape, there are two topics you need to consider:
The following sections describe the general considerations. If you need more in-depth or introductory information, refer to your host documentation.
NFS Boot Security
If you are planning to boot via NFS, the installation directory must be exported so the network computer can access the boot files. Select an installation directory tree that does not contain secured or proprietary information. For example, you may wish to install files under the directory /usr/tekxp instead of /tekxp. Thereby exporting the /usr partition instead of the root partition (/).
Secure tftp
There are considerations if the boot or font host use secure tftp. To determine if you use secure tftp, check the file /etc/inetd.conf for a line similar to:
- tftp dgram udp wait root /usr/etc/in.tftpd in.tftpd -s /tftpboot
The -s indicates the host is using secure tftp. The partial path name following the -s is the secure path (the only path searched for files used in tftp transfers).
If you are using secure tftp, note the secure directory at the end of the line. Use this directory as the parent directory for /tekxp.
Secure tftp does not follow symbolic links to files outside the secure directory, so all boot and configuration files must share a common parent directory. For example, you cannot link the file /tftpboot/tekxp/boot/config/xp.cnf to /usr/tekxp/xp.cnf. However, it is possible to symbolically link the secure directory to another partition if disk space is limited in the secure directory. For example, /tftpboot/tekxp could be linked to /usr/tftpboot/tekxp. Refer to your host documentation.
Preparing for Installation
Note: If you are not logged in as root, you are not be able to overwrite files from a previous installation.
- Use Table 1-7 to calculate the approximate size of the files you need to install. Use df to make sure you have enough disk space in the partition where you want to install the files. If not, select another partition that has enough space, like /usr, or increase the size of the logical volume.
- # df
Installing from CD-ROM
If you are installing via CD-ROM, you need to perform these steps:
Note: If there is another CD-ROM in the drive you must unmount (umount command) and remove the disc before you can insert and mount (mount command) the NCBridge CD-ROM.
- Extract the files from the CD-ROM:
- Continue to the section Using the INSTALL Script on page 1-31 to install the files.
Extracting All or Partial with the INSTALL Script
This procedure unloads the INSTALL script and then uses the script to select, extract and install the other files. The script automatically preserves existing configuration files when extracting the new files.
- Unload the INSTALL directory, then abort the tar command with Ctrl-C or whatever sequence you would normally use to stop a command.
- Continue to the section Using the INSTALL Script on page 1-31 to extract and install all or part of the files.
Extracting All Files with tar
If your system does not support the mt command, or if you have a non-standard tar command, use this procedure to extract and install the files:
- Extract the media contents (Table 1-8 lists <device> names):
- Connect to the tekxp/INSTALL directory:
- Run the INSTALL script to ensure the /tekxp directory tree is correctly built, and to modify applicable configuration files:
After extracting the INSTALL script, continue to the Using the INSTALL Script.
Extracting Partial File List with tar
If your system does not support the mt command, or if you have a non-standard tar command, use this procedure to extract and install a subset of the files:
- Extract the media contents, specifying only the directories ([ opt_dir ]) you want. Figure 1-1 illustrates the available directories. Table 1-8 lists <device> names:
- Connect to the tekxp/INSTALL directory:
- Run the INSTALL script to ensure the /tekxp directory tree is correctly built, and to modify applicable configuration files:
After extracting the INSTALL script, continue to the Using the INSTALL Script.
Installing From a Remote CD-ROM Drive
You may need to establish access to the drive.
On the host with the CD-ROM drive
- Edit the /etc/exports file to export the CD-ROM drive. Add the line:
- To enable the export:
- To verify the export:
- Once the CD is mounted and exported (or shared), it must be mounted by the host where NCBridge is to be installed.
- Extract the Install script as described in the previous pages by host type.
Using the INSTALL Script
Files are installed from the media using the provided INSTALL script. With the script, you can install everything or select only the files you need.
Refer to the Installation section for your host type earlier in this chapter.
When you run INSTALL, it creates a log file (/tekxp/INSTALL/install.log) to track installation activities. If you have multiple log files, the installation date and time are appended to the file. An example of why you might run the script multiple times, would be that you are doing a partial installation now, and then later as you add additional models or require additional support, you can install the other files as needed.
If you have a current installation, your configuration files are saved for you. Be sure to check the new configuration files for any new commands, and add any applicable commands to your saved configuration files.
- If there is a previous installation in the current directory, the configuration files (.cnf and .tbl files) are automatically preserved. The new configuration files unloaded from the media are stored in the file /tekxp/config_date where date is the installation date and time.
- Use the -host and -user switches to install the files from a remote host.
To run the installation script:
Note: For HPUX O/S v 10.1 or lower, use this file path:
/cdrom/COMMON/TEKXP.TAR\;1
- -move is used to skip the extraction portion of the script and only run the portion that relocates unloaded files to their correct location.
- -host and -user options are used to install the files from a remote host. You must specify a valid user name (user) for the remote host.
- The INSTALL script displays:
- Installation file selection is done by answering one or more yes/no questions. The default answer is 'y' or yes. The first question will ask if you want to do a full install. If you answer 'y' to this question, no more questions will be asked.
- Size of the entire installation is 54557 kilobytes.
Do you wish to do a full install (y/n)?- If you select y, the installation begins. If you answer n, prompts are displayed so you can select the groups to install. The xpbinaries and font groups are further subdivided for your selection.
- tekxp/boot files
- tekxp/boot/(XP binaries) files (Select y for yes, n for no, or p for partial.)
- tekxp/boot/fonts files (Select y for all, n for none, or p to select sub-groups.)
- tekxp/man files (Select y for all, n for none.)
- tekxp/mgmt files (Select y for all, n for none.)
- tekxp/obsolete files (Select y for all, n for none.)
- tekxp/examples files (Select y for all, n for none.)
- tekxp/bin files (Select y for all, n for none.)
- tekxp/src (Select y for all, n for none.)
- A confirmation prompt is displayed, showing the groups you have selected. Enter y to confirm the installation, or n to abort.
- When complete, remove the media from the drive.
After you complete the installation process, continue through this chapter and manual to configure the network computers for your environment.
Making the Utilities
For generic Unix hosts, the media contains source for clients in case they are not on your host.
Note: You may need to modify the source code or Makefiles to build these utilities in your environment. Create these libraries only if you need to make one or more utilities. In addition, utilities such as xpsh also require the system to have a libX11 and libXext (-lX11, -lXext on the link command line). The libXext library may be integrated into libX11 on some systems. If so, only the -lX11 switch would be needed.
- Create the libXp.a library:
- The cc command line define requirements are as follows:
- Host specific cc and linker options may be found if X has been built somewhere else on the system. Look in the X tree's config directory for an xxx.cf file, where xxx is the system abbreviation, for example, hp.cf or cray.cf. Check the -D defines to see how they are used on your system for building other X clients. Other system defines may be needed, such as:
- Trial and error may be necessary. When a compile error occurs, it is often an incompatibility in an include file. Check the include files for other -D defines or for other files being included. Another common possibility is if an included file is actually located in a different directory. Consult the appropriate man pages for more information.
- The user may want to #ifdef any changes with a system specific label which the compiler automatically defines, such as #ifdef sun for Sun systems. The user can usually find this with man cc or man cpp or sometimes by running cc -v.
These utilities are only necessary if they are not already on your system:
- /tekxp/src/bootp bootp (Bootstrap Protocol) establishes network communications. Refer to the Supporting a Centralized System chapter for your host type for bootp instructions.
- /tekxp/src/killall killall may be used by the other utilities.
- /tekxp/src/tftp tftp (Trivial File Transfer Protocol) is a file transfer protocol that can be used to download the boot file and other files. Refer to the Supporting a Centralized System chapter for your host type for tftp instructions.
- /tekxp/src/xev xev prints the contents of X events.
- /tekxp/src/xlock xlock locks the local X display until a password is entered.
- /tekxp/src/xlsfonts xlsfonts is a server font list displayer for X.
- /tekxp/src/xmodmap xmodmap modifies keymaps.
- /tekxp/src/xpsh xpsh downloads and executes local clients on a network computer.
- /tekxp/src/xrdb xrdb is used to read X resource files.
- /tekxp/src/xsetprop xsetprop is used to print hardcopies.
Getting Acquainted
This section describes adding the first network computer to your system. It contains an example step-by-step procedure for performing a basic network computer installation. By following the instructions in this section, you become familiar with the network computer's network configuration parameters, Boot Monitor, and Setup utility. In addition to learning about the network computer, the procedure presented in this section leads you through the basic host configuration procedures for supporting network computers.
These steps are performed during the basic network computer installation:
- Configure host files to support the network computer.
- Collect information about your environment which is needed to boot the network computer.
- Use the Boot Monitor to enter network computer communication parameters and establish a host connection.
- Log in through a Telnet session from Client Launcher.
- Use Setup to enter the network computer configuration parameters.
After the basic network computer installation is complete, the network computer can:
Basic Installation Example
Here is an example of the information needed for a sample Sun host environment:
Boot Host Name: oregon IP Address: 128.07.60.01
Network Computer Name: portland IP Address: 128.07.60.30
Netmask: 255.255.255.0
Gateway Address: 128.07.60.100
Broadcast Address: 128.07.60.255
Boot Method: nfs 8192Font Host Name: oregon IP Address: 128.07.60.01
Configuring Host Files
Modify the host configuration files and utilities to support the network computer:
- nfs (Network File Service) to provide booting service.
- tftp (Trivial File Transfer Protocol) to provide backup booting service.
- xdm (X Display Manager) to provide a host log in interface.
- cde (Common Desktop Environment) to provide a host log in interface.
- Set up HP VUE to manage network computer accounts (Hewlett-Packard hosts only).
- Export the boot and install directories (IBM hosts only).
For details about these configuration files and utilities, refer to the Supporting a Centralized System chapter for your host type.
Network Computer Worksheet
Complete this worksheet prior to powering on the network computer. When completed, the information on this worksheet assists you in booting the network computer and performing other procedures.
Use Table 1-8 to determine the correct boot file to use to boot your NC.
Note: Once booted, to see the OS file version currently in use, use the Unix what command. For example, what os.900.
b. Host IP address: IP address: _____._____._____._____
Note: Steps 10, 11, and 12 are only used when adding a network computer to a Token-Ring network. If the network computer does not have a Token-Ring interface, omit these items.
Powering on the Network Computer
Verify the physical installation of the network computer's cables, power cords, keyboard, mouse, and network connection with the pictorial installation sheet included in the packing box.
Turn on the network computer's power switch. On the first power-up, you must specify the keyboard you're using. By default, the North American 101/102 or VT200 is selected (depending on the connected keyboard). Press Enter or Return to accept this keyboard. If using a different keyboard or nationality, press the Spacebar to scroll through the list of available keyboards and press Enter or Return to select the appropriate keyboard.
After specifying the keyboard, press the Return or Enter key again to display the BOOT> prompt.
The BOOT> prompt indicates that you are in the Boot Monitor. The Boot Monitor is a simple, command-line utility that provides an easy way to input boot commands. These boot commands set the parameters which describe the network computer in your network environment.
The scoreboard is an area in the upper right-hand corner of the boot screen. At this time, the scoreboard shows only default values. Use the scoreboard to verify the entries you make in the steps that follow.
Booting the Network Computer
To enter a boot command, type the command plus its associated parameter after the BOOT> prompt. To complete an entry, press Enter. To see a list of the Boot Monitor commands, type help and press Enter.
Note: An "unrecognized command" error message and description appears on the screen if an invalid command is entered. The line numbers in the steps refer to lines on the network computer Worksheet (page 1-38) where you filled in the appropriate information. If you have not completed the Worksheet, do so now.
Using the Boot Monitor, perform the following steps:
Note: The lanspeed, mtu, and localaddr commands are only used when adding a network computer equipped with a Token-Ring interface. Skip to Step 4 if you are installing an Ethernet network computer.
>>> CAUTION: Disruption to the Token-Ring LAN may occur if you attempt to open communications with the wrong lanspeed setting.
- BOOT> lanspeed rate
- Enter the mtu command. (See Line 11.)
- Enter the localaddr command. (See Line 10.)
- Use the iaddr command to enter the network computer's IP address. (See Line 4.)
- Use the bpath command to enter the boot path. (See Line 5.)
- Use the imask command to enter the subnet mask. (See Line 7.)
- Use the ihost command to enter the boot host's IP address. (See Line 8b.)
- Use the igate command to enter the IP address for a gateway host if the network computer is booting through a gateway. (See Line 9.)
- Use the bmethod command to specify NFS as the boot method. The 8192 parameter represents an NFS read size.
Note: Check the scoreboard to verify your entries. If there is an error, re-enter the command using the correct value.
If the network computer locates the host and boot files, a progress bar appears on the boot screen showing the percent of download complete if connected to a 10M network. (No progress bar is displayed if it is a 100M network.) Once the network computer downloads all of the files required, a gray screen with an X-shaped cursor appears. If the boot process fails without error messages, you probably entered an incorrect parameter. Enter the appropriate command and parameter to correct the error. After correcting the error, execute the nvsave and boot commands. If booting fails again, refer to Chapter 12, Troubleshooting.
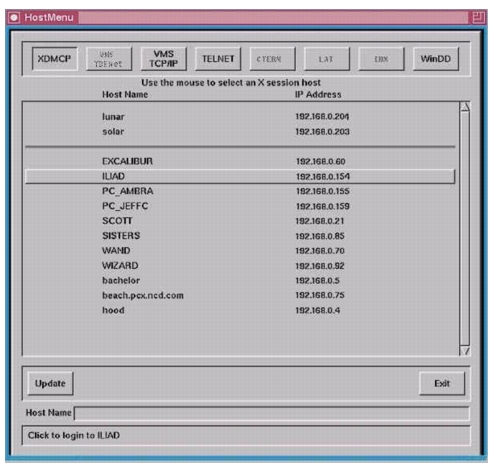
The HostMenu client appears. The network computer broadcasts XDMCP requests to all hosts on its subnet by default. All hosts that respond to the XDMCP broadcasts appear on this list. If you set up xdm on your host according to the instructions presented earlier in this chapter, the host should be listed on the HostMenu list.
Starting a Session with Launcher
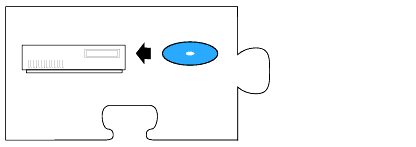
Client Launcher is used to start local clients by selecting a client from a menu. An arrow to the right of a Client Launcher entry indicates a submenu that contains additional local clients. In Figure 1-3 selecting Host Connections displays a sub-menu listing available host connections, such as Telnet or Cterm.
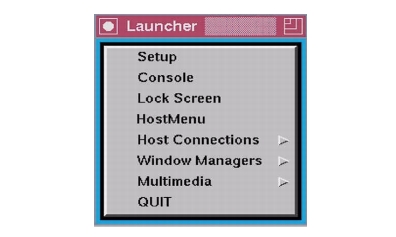
Figure 1-3 Example Client Launcher
- You can customize the Launcher client for your users through the
/<install directory>/tekxp/boot/config/system.launcher file. Refer to Chapter 9, Local Clients, for details.Press the Setup key to bring up the Client Launcher. The symbol in the left margin indicates a Launcher menu selection. If the Launcher is not present, press the Setup key or appropriate key combination for your keyboard as shown in Table 1-9.
Table 1-9 Setup Key and Key SequencesOpening a Telnet Session
Telnet provides a direct connection from the network computer to a host computer. When Telnet is running, the network computer acts as a standard VT102 terminal.
To open a Telnet session from Launcher:
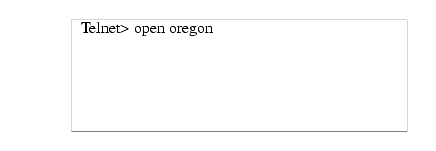
Figure 1-4 Telnet Window Waiting for an Open Command
Figure 1-5 Telnet Open Command
- Once a connection is made (Figure 1-6), you can log in.
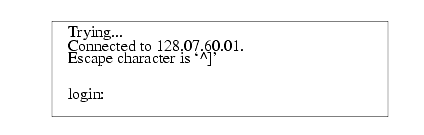
Figure 1-6 Telnet Window With a Host Connection
- At the login: prompt, log in to the host computer by entering your user name:
- At the password: prompt, enter your password:
- Set the display environment variable for the network computer by entering the following using the network computer's IP address:
- Enter the command to start your window manager. For example, if you run the Motif (MWM) window manager, you can type the following:
Closing a Telnet Window
To close the Telnet window from the Telnet> prompt, type quit and press Enter. When you are ready to conclude the Telnet session, log out of your host:
then enter quit to close the Telnet window:
Using Setup
Setup is a utility where you can add, modify, display, and save network parameters. Parameters can be saved in NVRAM, or written to a file.
The Setup main menu is illustrated in Figure 1-7. The Setup main menu is made up of four different areas: Menu Bar, Menu Input, Function Bar, and Message Box.
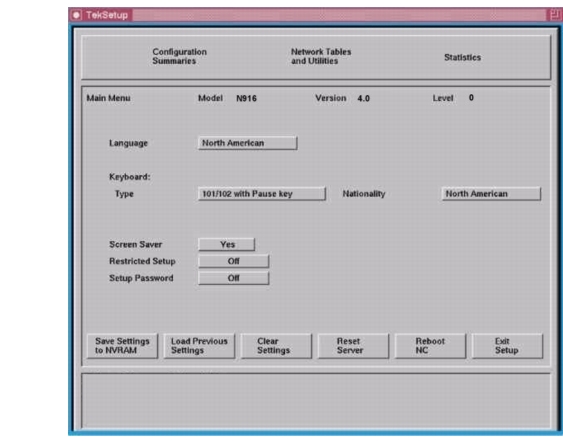
Figure 1-7 The Setup Main Menu
Note: The Setup window on your network computer may look different from this example based on your network computer model. Use the following procedures to enter configuration parameters using Setup. After each typed entry, press Enter.
- Drag in the Configuration Summaries menu and release on TCP/IP.
- Drag in the Configuration Summaries menu and release on
X Environment.- Drag in the Network Tables and Utilities menu and release on NFS Mount. Click on Add Table Entry.
- Drag in the Configuration Summaries menu and release on
Host File Access.- Drag in the Network Tables and Utilities menu and release on Internet Host. Click on Add Table Entry.
- Click on Save Current Settings to store the current settings in NVRAM.
Saving Setup Settings to a File
Setup entries can be saved to a host-based file which is then used to configure one or more network computers. This is a good utility to create an initial remote configuration file, or for users to create an individual, customized file.
Note: If using TFTP as the access method, the new file must exist before performing the Save Settings to File.
To save the current Setup settings to a sample remote configuration file:
- Drag on Configuration Summaries and release on Save Settings to File.
- Enter your host name or address:
- Click on NFS for the Save Setting Access Method.
- Enter the NFS local directory you defined earlier in this chapter along with the file name. You can look up the local directory name by dragging on Network Tables and Utilities and releasing on NFS Mount. An example file name is /tekxp/boot/config/xp_cnf_new. You can then compare the saved file with your existing xp.cnf file.
- Click on Save Settings to File. A message appears to confirm the settings were written to the file.
- Click on Return to Main Menu.
You can edit or view the created file with a text editor. Since we have only made a few changes in this chapter, the created file probably does not have all the information your site requires, but can serve as an example of a remote configuration file.
Exiting Setup
When you are ready to exit Setup, click on the Exit Setup button.
Once you have successfully completed a basic network computer installation, go on to the Supporting a Centralized System chapter for your host type.