Getting Started
This chapter describes how to configure teemX for compatibility with your hardware and the application.
When you load teemX for the first time, the DEC VT400 (7-bit) emulation will be running by default. The current emulation can be changed in one of two ways, either from the status line or by using a setup dialog box. When an indicator status line with six buttons is displayed at the bottom of the window, you can change the current DEC VT terminal emulation to any other DEC VT terminal emulation (VT52, VT100, VT400 7-Bit or VT400 8-Bit) by clicking the button indicating the current emulation.
All the terminal emulations supported by teemX can be accessed from the Emulation Settings dialog box. This is displayed by selecting Settings in the menu bar then Emulation... The emulations available are listed in the Alpha Emulation box. To change the current emulation mode, click the pointer on the name of the emulation required then click Ok. The new setting may be saved so that teemX will automatically run it when loaded or reset by selecting the Save Settings option in the File menu.
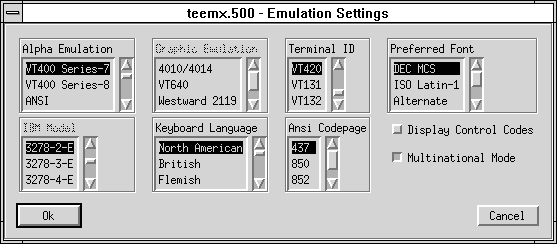
Alpha Emulations
The VT52 and VT100 emulations enable you to run applications written for the DEC VT52 and VT100 terminals, respectively.
The VT400 Series-7 and VT400 Series-8 emulations are emulations of the DEC VT320 terminal, the difference is in their treatment of 8-bit control codes. When VT400 Series-7 is selected, all 8-bit codes are converted to their 7-bit equivalents, whereas VT400 Series-8 leaves 8-bit codes unchanged. If you are using VT200 applications, select VT400 Series-7.
The ANSI-BBS emulation is a derivative of the ANSI device driver ANSI.SYS supplied with all DOS based PCs and which provides the screen management for the DOS console screen. PC based UNIX systems and Bulletin Board Systems (BBS) often rely on the ANSI emulation when being accessed by a PC. In ANSI-BBS mode the screen size is adjusted to 25 lines and the Preferred Font is automatically set to ANSI-BBS. The setting of the ANSI-386 Codepage option in this dialog box determines the characters available in the ANSI BBS set. Refer to the Setup Menus chapter for details.
The IBM 3270 emulation provides compatibility with software designed to drive the IBM 3270 terminal. Note that the initial display will be an ASCII text screen known as the Network Virtual Terminal Mode. You are required to make a host connection using the Telnet facility supplied with teemX in order to display the IBM 3270 screen and enable the emulation to function correctly. The setting of the IBM Model option in this dialog box determines the size of the display and whether or not extended attributes are supported (this must only be changed while running the IBM 3270 emulation and the new setting will not take effect until you save it and restart teemX). Refer to the IBM 3270 Emulation chapter for more information on this emulation.
The IBM 5250 emulation provides compatibility with software designed to drive IBM 5250 type alphanumeric terminals. This emulation can be used for connection to an IBM AS/400, System/36 or System/38. Note that the initial display will be an ASCII text screen known as the Network Virtual Terminal Mode. You are required to make a host connection using the Telnet facility supplied with teemX in order to display the IBM 5250 screen and enable the emulation to function correctly. Refer to the IBM 5250 Emulation chapter for more information on this emulation.
SCO Console is an emulation of the SCO UNIX box.
teemX has its own inbuilt telnet driver so that precise control can be exercised over the information that teemX receives and transmits. You must use the telnet facility provided by teemX when using block mode emulations such as the IBM 3270.
A telnet session can be initiated from a dialog box while teemX is running or by using resources or command line options. Note that teemX must be configured so that it is running the required terminal emulation before initiating a telnet session.
You can initiate a telnet session while teemX is running by displaying the File menu and selecting the Open Telnet option.
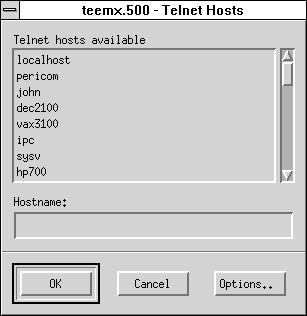
A list of hosts currently available for connection will be displayed in the Telnet Hosts Available list box.
Clicking the Options button will display another dialog box with additional telnet options. These are described in the Setup Menus chapter.
To make a connection, either click on the name in the list box or type it in the Hostname text box or line, then click Ok. To save the settings so that they will be automatically reasserted when teemX is subsequently reset or loaded, display the File menu and select the Save Settings option.
The teemX window consists of various elements which are described in the following sections.
The title bar displays the name of your version of teemX software by default. You may change the title displayed by using the title resource or -title command line option followed by a space then the title to be assigned. This is useful for identifying each window when more than one instance of teemX is being run. Refer to the Resources & Command Line Options chapter for more details.
The menu bar provides access to a series of commands and dialog boxes which enable you to perform various functions and configure teemX for compatibility with your hardware and the application. Three menus may be displayed from the menu bar. To display a menu, click on its title.
To select an option in the menu, just click the pointer over it. To close the menu without selecting an option, move the pointer outside the menu and click the left mouse button. All the options listed in the menus are described in the Setup Menus chapter.Window Resize Commands
The menu bar includes two commands labelled < and > which enable the window size to be decreased or increased, respectively.
When the < command is clicked, teemX will scan a list of known fonts and select the next smallest font to that currently being used. The window size is then decreased so that it contains exactly the same number of rows and columns as before.
When the > command is clicked, teemX will scan a list of known fonts and select the next largest font to that currently being used. The window size is then increased so that it contains exactly the same number of rows and columns as before.
You can achieve the same effect using the keyboard by pressing the Meta and < keys together to decrease the window size, or Meta and > to increase the window size.
Note: The action names for these functions are decrease-font()
and increase-font(). They can be reassigned using the Translation tables as described in the Keyboard Operation chapter.
The window resize commands may be disabled using resources as described in the Resources & Command Line Options chapter.
Displayable data is stored in a buffer which may be larger than the window. The scroll bar down the right edge of the window represents the entire buffer and enables you to display data that is above or below the current view of the window.
The number of text lines displayed in the window is specified by the defaultLines resource or -dl command line option (default 24 lines), and the number of lines stored off-screen in the buffer is specified by the saveLines resource or the -sl command line option (default 24 lines).
The scroll bar represents the entire buffer and the scroll thumb represents the portion of the buffer currently displayed in the window, consequently the size of the scroll thumb will vary.
The window contents can be moved up or down by placing the pointer over the scroll thumb, holding down the middle mouse button then moving the mouse up or down.
Placing the pointer anywhere in the scroll bar then clicking the left mouse button will scroll the window contents up the number of lines equal to that from the pointer position to the top of the window. Clicking the right mouse button will scroll the window contents down the number of lines equal to that from the pointer position to the bottom of the window.
Scrolling Using The Keyboard
When you are running one of the DEC 'VT' terminal emulations, you can scroll vertically by holding down the Ctrl key and pressing the Up or Down Cursor keys.
When you are running one of the DEC 'VT' terminal emulations, it is possible to make the width of display memory larger than the width of the window by using the Page Width option in the Terminal Settings dialog box. When you want to view columns stored off-screen, you can scroll horizontally by holding down the Ctrl key and pressing the Left or Right Cursor keys.
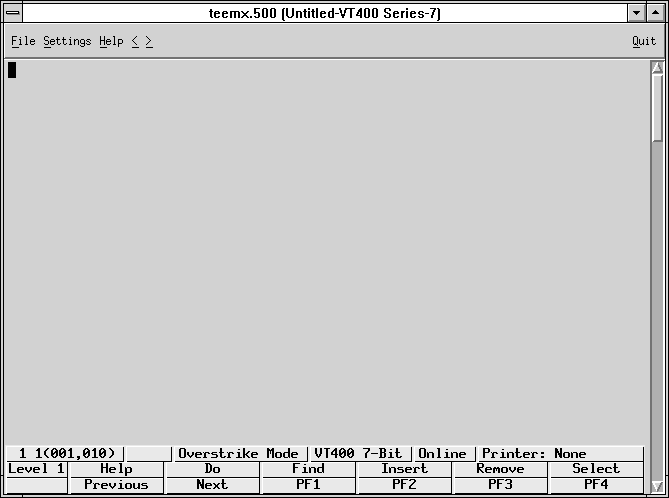
A status bar can be displayed on the last line in the window when running any of the DEC VT, ANSI or SCO-Console emulations.
You may choose not to display a status bar, or enable a host-writable status line to be displayed instead. The type of DEC status line displayed is determined by the setting of the Status Line option in the Terminal Settings dialog box. (Refer to the Setup Menus chapter for details.)
The indicator status bar consists of six buttons which show the status of various operations and enable you to make selections. Some buttons can be clicked using the mouse pointer to change their state.
![]()
1 2 3 4 5 6
Button 1: This button displays the active session (always 1), the current page number (always 1), and the line,column location of the text cursor.
Clicking the button will activate the Hold Screen function, stopping data from scrolling in the window. To resume scrolling, click the button again.
Button 2: This button toggles the visibility of the soft buttons displayed at the bottom of the window on and off.
Button 3: This button indicates whether Overstrike Mode or Insert Mode is currently selected.
In Overstrike Mode (default), new characters will replace already existing characters at the cursor position. When Insert Mode is selected, new characters will be inserted at the cursor position without deleting existing characters, which will move to the right.
Button 4: Indicates the current DEC VT alpha terminal emulation (VT52, VT100, VT400 7-Bit or 8-Bit). Clicking the button enables you to select a different DEC VT alpha terminal emulation mode without having to display the Emulation Settings dialog box, which will be updated automatically with the new setting.
Button 5: Indicates whether you are Online to the host or in Local mode. Clicking the button will toggle between the two modes.
Button 6: Indicates the status of the printer as follows:
None signifies that the printer is not turned on or not connected.
Not Ready signifies that the printer is not ready to receive data for printing.
Ready signifies that the printer is ready to receive data for printing.
Auto signifies that the emulation is in Auto Print mode in which the current cursor line is sent to the printer when a command for the cursor to move to the next line is issued.
Controller signifies that the emulation is in Printer Controller mode in which the host has direct control over the printer. Print screen commands issued from the keyboard or mouse will be ignored.
This button does not perform any function when clicked.
A series of buttons is displayed below the status line at the bottom of the window by default when teemX is loaded. These can be programmed so that they perform various functions when clicked. The buttons have default definitions in some emulations. The following illustration shows the default definitions when running the VT400 emulation, in which the buttons on level 1 are programmed to perform DEC VT320 keyboard functions.
![]()
There are four levels of soft buttons. Each level consists of two rows with six programmable buttons on each row. This provides a combined total of 48 programmable buttons. All levels are accessible even if not all are displayed. Levels stored off-screen can be 'scrolled' into view by clicking the Level button. You can specify how many levels of soft buttons are actually displayed by using a resource or command line option.
The soft buttons are programmed using the Macro Settings dialog box, which is displayed by selecting Settings in the menu bar then Macros... Refer to the Setup Menus chapter for information.
You can toggle the visibility of the soft buttons on and off by clicking the second button in the DEC indicator status line.